Here are some interesting Operating system and softwares tips and tricks 4u.JUST CLICK ON THE PICTURE IN THE BLOG FOR ENALARGED VIEW.

sd

Tuesday, November 1, 2011

Solving the issue for ‘unknown device’ in the Device Manager in ASUS motherboards

By Tuesday, November 01, 2011 No comments
              You have assembled a PC with an ASUS motherboard. But the device manager has a yellow exclamatory mark with says ‘Unknown device ATK0110’, and updates just don’t help!
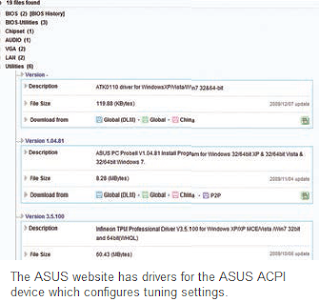
             ‘ATK’ actually stands for ‘AsusTek’ and behind the ‘ATK0110’ device is the manufacturer’s own ACPI utility. It provides special extensions for Asus tools for power and performance management of the motherboard, such as the AI booster which can be used to overclock the complete system. The relevant driver can be found on the installation CD of your board or the latest version can be downloaded from the Asus support sites. The easiest way to access it is via www.support.asus.com. In the search field, enter the type name of your motherboard, e.g. ‘P5Bxxxx’. A page with your board at the uppermost position is then displayed. Now click the field of the relevant download and then click the ‘Utilities’ tab on the next page.The following list contains a download WIth the description ‘ACPI driver for ATK0110 virtual device’. This driver must be downloaded, unzipped and installed from the Device Manager. As a result, not only does the yellow exclamation mark disappear but the driver also provides the ASUS tweaking tools with direct access to the power-saving and overclocking mechanisms of the board.
Read More...

Solve the automatic update issue when using Kies in Samsung Wave

By Tuesday, November 01, 2011 No comments
             You start the update function of your smart phone Samsung Wave. However during the update, the device crashes due to an ‘Unexpected Error’. Even a restart does not help.
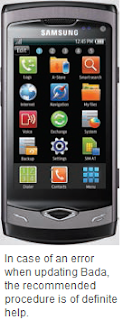
             Nothing seems to work when an update process crashes. The slightly problematic programming of the recovery tool prevents anything from being displayed on the computer as well as the smart phone as a result of which the hassled user gets no messages for seconds or even minutes together – yes of course, even the connection between the two devices seems disrupted although it is very much in place in reality and the restoration process is also very much on. Thus when the yellow triangle displays that the connection is broken, follow the instructions provided by the Samsung management tool (Kies).
              First disconnect the connection cable, remove the battery from the smart phone for a few seconds and re-insert it. Press the keys [Volume], [Camera] and [OK]. An unusual image is now displayed on the phone, namely the ‘Download mode’ note in red font embedded in a blue box. Then reconnect the connection cable and start the Firmware Update normally. Don’t worry if the Samsung tool does not shows the connection. Only the usual progress bar needs to be displayed on the phone that shows the loading status of the new Firmware. If the software is completely loaded, you see the note ‘Firmware update is restored’ and then shortly after that ‘Update has been started’.
Read More...

Upgrade 3D function in Sony PlayStation PS3

By Tuesday, November 01, 2011 No comments
             If you have a Sony PS3 gaming console, you know that it is more than just a console. Here comes another feature with 3D.
             This tip basically lies in the fi rmware update. You must fi rst update the operating system of your PlayStation 3. Connect your PS3 to an internet connection. To update the PS3’s fi rmware, go to ‘Settings’ in the menu options and then click on ‘Update system’. Now click ‘Update via Internet’. Once done (after the download and installation), the PS3 will automatically restart. Next are the connections to your TV. For that, again go to the ‘Settings’ sub-menu and to the ‘Display settings’. Click ‘Video output settings’ and select the connection type ‘HDMI’. At the settings method, search for ‘Automatic’ and confi rm the next question with ‘Yes’.
              Now you need to specify the TV screen size. Measure your TV screen size (which you should defi nitely know) and adjust the size of your TV in inches in the menu. By default, the size is set to 50 inches which you should change according to your TV size. With the cross pad to the left of the PS3 controller, you can enter the actual display size and then confi rm the selection with the ‘X’. The PlayStation 3 will now show you your settings in an overview. If everything has worked well, both points ‘720p (3D)’ and ‘1080p (3D)’ should appear below. With that, the confi guration of the PS3 for 3D fi lms has been made ready.
NOTE: You should have a 3D TV to watch 3D content via the PS3. 3D TVs have a frequency of 120 Hz. Regular HD LCDs and LED TVs are not 3D unless specifi ed.
Read More...

Do away with outdated Java consoles installed in the browser in Firefox 2.x, 3.x

By Tuesday, November 01, 2011 No comments
             One look at the list of the installed extensions shows numerous “Java Console” entries. They can only be deactivated via a button but cannot be uninstalled, and they are not at all required. It should be possible to get rid of them for good.
             Unlike most of the extensions, old versions of the Java Console are not automatically uninstalled during update. Moreover, they are not saved in the profi le folder but directly in the program folder of Firefox as global extensions for all users and cannot be uninstalled via the Extensions dialog box.
             The deletion takes place by removing the relevant folder in the system. For this, fi rst close Firefox. Then start Windows Explorer and go to folder “C:\Program Files\Mozilla Firefox\extensions”. There are several sub-folders there whose name always starts with “{CAFEEFAC” and which always contain a specifi c version of Java Console. The exact version can be identifi ed from the parts of the folder name. Thus, the name for Version “1.6_0_022” is “{CAFEEFAC- 0016-0000-0022-ABCDEFFEDCBA}”. Delete such folders from the last version. If you are working with an account without admin rights, the user account control of Windows requests that you enter an administrator account along with the relevant password. The next time onwards that you start Firefox, the list of the old Java Consoles is cleared. Applications based on technology are still functional.
Read More...

Saturday, October 29, 2011

Increase the frequency of automatic retrieval in Outlook 2007, 2010

By Saturday, October 29, 2011 , No comments
             Outlook usually retrieves new messages automatically. But you have to wait for ages till the program in the background receives new messages.
             Outlook retrieves new messages every 30 minutes by default. But today’s fast computers and Internet connections makes shorter intervals also easily possible. The relevant options are unfortunately hidden away in the program. In Outlook 2007, open “Tools → Send/Receive → Send/Receive Settings → Define Send/Receive Groups.
             In Outlook 2010, select the “Send/Receive” tab in the menu bar, click “Send/Receive Groups” there and then “Defi ne Send/Receive Groups”. If you have not set up any specifi c groups, your list will only have the default group “All Accounts” and it is already selected. Else, select the relevant group in the list fi eld. Now ensure that the option “Schedule an automatic Send/ Receive every” is activated. Change the value in the input fi eld to “10” or “5” minutes, for instance. Repeat the setting for other groups id required. Confirm the change by clicking “Close”.
NOTE: Avoid an extremely short interval of one minute, since it can cause problems when large messages are being downloaded. This is because a new retrieval starts when the previous one is not yet complete. If you are waiting for an important message, you can request receipt of emails manually as well.
Read More...

End a hung tab or tools in Chrome 4, 5, 6, 7

By Saturday, October 29, 2011 , No comments
             Sometimes, individual scripts or websites are defective and hang or an extension in the browser causes problems. It is usually necessary to restart the browser which is very irritating.
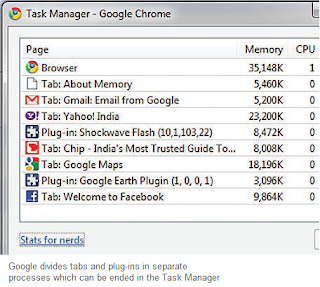
             Chrome was the fi rst browser to introduce a consistent separation of individual tabs at the process level. You can check this by starting the Task Manager when there are several tabs open in the browser. For this, press the key combination [Ctrl]+[Shift]+[Esc] and switch to the “Processes” tab. For example, in case of four open tabs, you see the process “chrome.exe” at least fi ve times, as a result of which it is not clear as to which process entry belongs to which tab.
              This information is provided by the internal task manager of Chrome. It can be called up from the Chrome program window by pressing the key combination [Shift]+[Esc]. You can also right click a free place above the address bar and select the contact command “Task Manager”. The following dialog box displays the tab or the plug-in with which a process correlates. Select the desired input and click “End process”.
              The link at the bottom of the task manager box “Stats for Nerds” can be used to call up more detailed information about memory use of individual processes and to identify which website is especially hungry for memory. Moreover, the overview also shows the memory requirement of all other currently opened browsers.
                You can thus end a hanging Flash Player or close a tab with a problematic website easily without affecting the remaining browser. The closed site displays a message in the tab and also makes it possible to reload the site.
Read More...

Increase the frequency of automatic retrieval in Outlook 2007, 2010

By Saturday, October 29, 2011 , No comments
             Outlook usually retrieves new messages automatically. But you have to wait for ages till the program in the background receives new messages.
             Outlook retrieves new messages every 30 minutes by default. But today’s fast computers and Internet connections makes shorter intervals also easily possible. The relevant options are unfortunately hidden away in the program. In Outlook 2007, open “Tools → Send/Receive → Send/Receive Settings → Define Send/Receive Groups.
             In Outlook 2010, select the “Send/Receive” tab in the menu bar, click “Send/Receive Groups” there and then “Defi ne Send/Receive Groups”. If you have not set up any specifi c groups, your list will only have the default group “All Accounts” and it is already selected. Else, select the relevant group in the list fi eld. Now ensure that the option “Schedule an automatic Send/ Receive every” is activated. Change the value in the input fi eld to “10” or “5” minutes, for instance. Repeat the setting for other groups id required. Confirm the change by clicking “Close”.
NOTE: Avoid an extremely short interval of one minute, since it can cause problems when large messages are being downloaded. This is because a new retrieval starts when the previous one is not yet complete. If you are waiting for an important message, you can request receipt of emails manually as well.
Read More...

Use hardware graphics acceleration now in Chrome 7

By Saturday, October 29, 2011 , No comments
             Google aspires to accelerate its browser with the help of a graphic card in future. But is that possible even now?
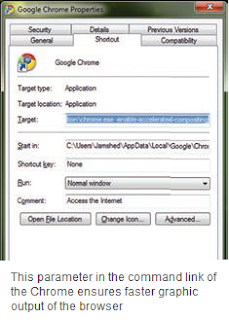
            The final integration of GPU acceleration in Chrome has been shifted to Version 9. However the initial steps are done and can be used in Chrome 7 as well. You can activate them with a command line parameter.                    
           For this, close Chrome and right click the link for the browser on the desktop. Then select the context command “Properties” and activate the “Link” tab. Click in the “Target” input fi eld and press the [End] key to position the cursor at the end of the line. There, you add a space to the parameter “-enable-acceleratedcompositing”. Confi rm this change with “Apply” and then “OK”.
           The processor of the graphic card supports the rendering of websites from the next time the browser is started. Depending on the computer confi guration, there is always a speed advantage when displaying websites with complex graphical content.
Read More...

Adapt the automatic correction function to your working style(Word 2003, 2007, 2010)

By Saturday, October 29, 2011 , No comments
            When you switch over to a new version of Word, you come across a lot of automatic corrections which often prove to be more of a nuisance than help. It is really annoying when Word starts every new row with a capital letter, or abbreviations like Dr. rer. nat. get automatically and incorrectly changed to “Dr. Rer. Nat. This can be rectifi ed in the options. For this, click the Offi ce button and then “Word Options” in Word 2007, open “Proofi ng”. Then select the category “AutoCorrectOption”. In the older versions, the command is included in the “Tools” menu. Deactivate the “Capitalize fi rst letter of sentences” option in the “AutoCorrect” tab. Also deactivate the “Capitalize fi rst letter of table cells” option. Switch to the “AutoFormat during input” tab and then decide which options are required for your method of work and which aren’t. Functions such as “Automatic numbering” and “Replace Internet and network paths with hyperlinks” are sometimes practical. Confi rm the open dialog boxes with “OK”.
NOTE: Formatting that is automatically adopted by Word can be reset when editing the text using the key combination [Ctrl]+[Z].
Read More...

Play problematic MP3 files in spite of a defect in iTunes

By Saturday, October 29, 2011 No comments
              Some MP3 fi les cannot be imported into iTunes whereas some others encounter problems when playing. But the moment you play it in Windows Media Player, it works! So what exactly is the problem?
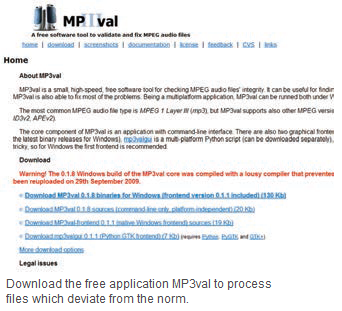
               iTunes takes the correct format of MP3 fi les very seriously and refuses to work if the files are corrupt. If other programs can play the fi le, then it means there are only a few incorrect specifi cations in its header. This can be corrected with the free program MP3val.
               Unzip the archive into an empty folder. It contains the program “mp3val.exe” which is a tool for the command line, the operating manual “manual.html” and the user interface “mp3valfrontend.exe”. An important tip here: Do not use the tool for all fi les of a music collection, since the repairs will delete or modify more data than required.
WINDOWS 7: Since the graphical interface does not work with Window 7, you need to control the tool from the command line. However, you can correct all the fi les at once. First copy the problematic MP3 title into the program directory of MP3val. Then click in Windows Explorer with the [Shift] key pressed and right click the program folder and select “Open command window here”. Now start the analysis of the music fi les with the “mp3val *.mp3” command. Analyse the messages using the English manual. You can usually use the command to start the cleaning and then test the corrected fi les with iTunes.
OTHER WINDOWS VERSIONS: Start the fi le “mp3val-frontend.exe” and drag the relevant music fi les to the program interface – the tool displays a list. Click the magnifying glass icon to start the testing. In case of problems, start the correction of the title via the cogwheel icon. Your fi les should be processed and ready without further problems.
Read More...

Solve starting problems of Word, Excel and Co(Office 2007, 2010)

By Saturday, October 29, 2011 , No comments
             An error message is displayed when you try to start Office applications but the programs do not open. Does that mean that you need to re-install Word?
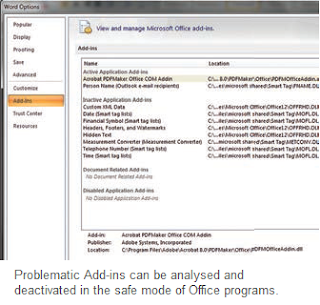
             A frequent cause of problems faced during starting are damaged or incompatible Add-ins and automatically opened fi les from the start folders. You can resolve the problem in the safe mode. In order to call up the safe mode, keep the [Ctrl] key pressed when starting the program till the start message is displayed. Then confi rm the safe mode with “Yes”. Now all templates, add-ins, additional start fi les and your personal settings are deactivated. Now open ‘File | Options” or click the Offi ce button in Version 2007 and then the relevant program options. Then click the “Add-Ins” category to the left. In the “Manage” combination fi eld, select the setting “COM-Add-Ins” and click “Go To”. You can now deactivate every add-in individually using the checkbox. Lastly, confi rm the dialog box with “OK”. Repeat the entire process for “Templates” as well as for the normal add-ins comprised in this dialog box. The program should now restart. Now activate all add-ins one after the other and restart the application every time. If the incompatible extension is active, the Offi ce program rejects the restart. You have thus unmasked the cause of the problem and can eliminate it.
Read More...

Add words to AutoCorrect with increased speed(Word 2007, 2010)

By Saturday, October 29, 2011 , No comments
           You often save abbreviations and words in AutoCorrect so that Word inserts them automatically. But unfortunately, it takes a lot of clicks to reach the dialog box, and that can be annoying!
            From its Version 2007 onwards, Microsoft has nicely tucked away “AutoCorrect Options”. If you need to access it often, it is ideal to defi ne a key combination for it.
            Or you can anchor the command in “Quick Access Toolbar”, which is the icon bar that you can in the upper left corner of the screen in Word 2007. For this, right click at a free place on the menu bar and select the context command “Customize quick access toolbar”. In the combination field “Choose Commands from”, change the setting to “All Commands”. In the list below, search and select the entry “AutoCorrect Options” and then click “Add” button in the centre. Confirm the dialog box with “OK”.
             If you want to defi ne another key combination in stead of or in addition to this one, click the Offi ce button in Word 2007, select “Word Options” and then “Customize”. In Version 2010, open “File → Options” and select the category “Adapt Menu Bar”. Then click “Adapt” near “Key combinations”. Select the “All Commands” setting at the end of the list to the left in the “Category” fi eld. Select “EditAutoText” in the list to the right and click in the input fi eld for the key combination below. Now press an unused key combination, such as [Ctrl]+[Shift]+[G], click “Assign” and then “Close”. After that, you will be able to access the desired dialog box immediately using this key combination. If a word is already selected, Word adopts it into the AutoCorrect dialog box.
Read More...

Display the month or day for a specific date(Excel 2003, 2007, 2010)

By Saturday, October 29, 2011 , No comments
           You want to define the month or the day for a specifi c date automatically in a work sheet.
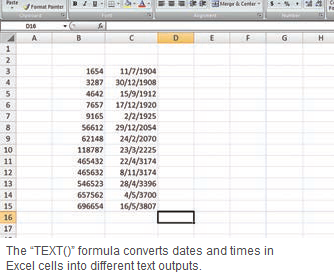
           Use the Excel function “TEXT()”. It converts numeric values into text outputs. Excel internally saves a date as a numeric value. You can infl uence the text output using the formatting sign and can for instance determine the week day for a particular date. The function has two parameters: the numeric value to be converted and the formatting sign with inverted commas on both sides.
           An example explains the process: the “A1” cell has a date. You now want to display the week day for this date in the adjoining cell “B1”. For this, enter the following formula in the “B1” cell: - TEXT(A1, “tttt”)
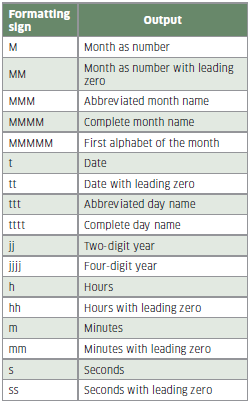
           The formatting sign “tttt” coverts the specifi ed date into a week day. If you only require an abbreviation of the week day, you can use the “ttt” format, for instance. The time can be displayed in the 12-hour format with an identifi er for mornings (am) and afternoons (pm). For this, add the desired identifi er “AM/PM”, “am/ pm”, “A/P” or “a/p” after the time format, separated by a space.
           These different formatting signs can also be combined. If, for instance, you want to display the exact time without the seconds, you can use =TEXT(A1,“hh:mm”).

           If the time is in the 24-hour format, and Excel needs to display it in a 12-hour format, then you can use =TEXT(A1, "hh. mm am/pm"). The table (above) lists the possible formatting signs and their functions for date and time output. Pay attention to the upper and lower cases here.
Read More...

Saturday, October 22, 2011

Read out or delete the BIOS password successfully in Desktop computer

By Saturday, October 22, 2011 No comments
         Your security awareness has become a curse for you. You now want to reconfigure  your  BIOS  but  have forgotten the password to it.
         The easiest way to reset a BIOS password is to use the Clear RTC jumper. This  jumper  is  present  on  almost  all classic motherboards in desktop PCs. Search for ‘BIOS Reset’, ‘Clear RTC’ or ‘CMOS Reset’ in the manual of your motherboard (if you don’t have the manual, you can download it from the manufacturer’s website if required). The instructions are often in the ‘Jumpers’ chapter. If your motherboard does not have a suitable jumper, then you can try resetting the BIOS RAM values to default by  removing  the  CMOS  battery.  Always disconnect the computer from the main plug. Remove the lithium button cell and place a 50 p coin in the battery holder (to short out the pins). This ensures that any residual voltage holding the content of  the  BIOS  memory  is  done  away  with. Now wait for at least 10 minutes (15 minutes if you are in a cooler area) before removing the coin and re-positioning the battery. During the booting process, enter the BIOS and load the default settings. You can re-confi gure BIOS after a restart. This does not usually work for notebooks, laptops and netbooks. In this case, you should seek help from the manufacturer’s help desk or service center.
Read More...

New features for your media client via firmware update in WDTV Live Plu

By Saturday, October 22, 2011 No comments
            You are impressed with the WDTV Live Plus you recently purchased. It plays smoothly  and  is  easy  to  operate. Don’t you think you could've got even more?
           Media  clients such as WDTV Live Plus from Western Digital enjoy huge popularity and allow reproduction of multimedia content directly from a USB stick, external portable drive, from media servers in the LAN or over the Internet.The WDTV box could have a lot more within. It plays YouTube videos or Pandora Internet Radio streams with least effort. With the new Firmware version 1.04.10 dated 13.1.2011, it now supports Facebook, Blockbuster on Demand, Deezer, Flingo and AccuWeather.com as well. You would now probably wonder how you can manage your Facebook account with the WDTV remote control. Well, you do not have to! You can now connect a keyboard to the USB port. This will make not only Facebook easier to operate, but it will  also be  much easier to surf  through YouTube videos since you no longer need  to  select  the  particular  alphabets using the remote control. Furthermore, you can now also download two files simultaneously. In theory, these features have always been there, but not used until now. The easiest way to update the fi  rmware  of  your  WDTV  box  is a functional Internet connection during the device startup. The box checks whether a new fi rmware is available at the time of every booting and asks whether you want to install it. If you click on ‘Yes’ (with the remote control), everything runs automatically without any effort.
Read More...

Configure and use QuickSteps practically in Outlook 2010

By Saturday, October 22, 2011 , No comments
             Outlook 2010's new QuickSteps section helps you simplify day-to-day work.
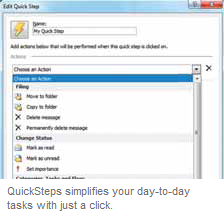
             The new QuickSteps are like mini macros with which you can complete your daily tasks with just a couple of clicks. QuickSteps help you manage the mails flooding your inbox in an efficient and practical manner. If you file your emails into folders in Outlook, then QuickSteps  is a life saver. Earlier,you  had to  manually  move  emails  to  the  desired folder. However, with QuickSteps, you can do so with just  a click. You can,for instance, forward an email directly to your team by just specifying their email ids while creating the QuickStep. Similarly, you can create QuickSteps to perform several task like send to archive, send to folder (specify folder name), delete, mark as read, etc. Additionally, if you have a long email conversation, then keeping track of it can become difficult. You can simplify the process by setting up a Meeting Reply QuickStep with the people involved.  This  will  ensure  easy  and  quick access to all the conversations. Also, it’s easy  to  manage  the  QuickSteps  that  you create. You can easily edit, modify, reset or delete these QuickSteps.
Read More...

Printing the favorites list from Internet Explorer.(Internet Explorer)

By Saturday, October 22, 2011 , No comments
          You can print all your favorites from Internet Explorer for easy reference.
          Select the ‘File | Import and Export’ command from the menu bar. Next, select the option ‘Export to a File’ and then, select ‘Export Favourites’. Next, specify the fi le name and location. The file  will  be  saved  as  an  HTML,  which  can be easily opened and printed via Word or the browser. However, only the names will be displayed and not the links.
Read More...

Use add-ons in Opera as well – finally!

By Saturday, October 22, 2011 , No comments
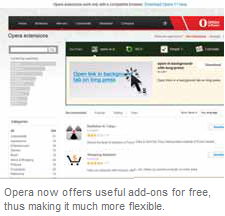
            Opera has led the way for a lot of new functions, but it lacked the flexibility offered by other browsers. All that is set  to  change  now,  as  it  fi nally offers add-ons.
            Previously, it was possible to improve the functionality of Opera by means of widgets. But from Opera 11 on wards, you now have add-ons that are similar to those available for Firefox. You can see the list of    add-ons by visiting http://www.opera.com/addons/. It has many useful add-ons and one such tool is ‘Documents Preview’, which provides a quick preview of documents like PDF, DOC or PPT.This  is  done  with  the  help of  a  JavaScript  that  guides  you  to  a preview with the Google Observer. Some other useful apps include ‘NoAds’, an advertisement fi lter, ‘GmailChecker’ that displays the number of unread messages in your Gmail inbox, and ‘LetPass’ that manages passwords. The overview and configuration of your add-ons can be set via ‘Menu | Add-ons | Manage Add-Ons’. You can ‘Disable’, ‘Uninstall’ and configure add-ons individually.
Read More...

Load open tabs in the Web browser only on request(Firefox)

By Saturday, October 22, 2011 , No comments
              When using Firefox, you end up having lots of tabs open for a quick overview of all the important websites. But this can slow down the start-up and cause problems as all the tabs load simultaneously.
              Having  lots  of  tabs  open  when working can cause your browser to slow down, especially when you restart it. It will take a lot of time to restore all your tabs; this is where the free Bar Tab add-on for Firefox will come in handy. You can download the add-on from https://addons.mozilla.org/en-us/firefox/addon/bartab. Once you install it, you can put all the tabs that you require frequently in here. And when the browser is  restarted, BarTab will not load  these tabs automatically,but only when you specifi cally visit them. It will show you the status for each tab, you can load the ones that you need and unload the rest. Furthermore, you have the option to specify which tabs should be loaded and which should never be loaded at the start.
Read More...

Adopt signatures and templates from an older version in MS Outlook 2003,07,10

By Saturday, October 22, 2011 , No comments
               You have integrated your new PST file (Personal Store) after switching to a new version or after reformatting your computer. But some data, such as the email signatures, etc. is missing.
               Outlook saves elements such as signatures, templates and regulations not in the PST fi le, but in the Registry or  in  separate  fi les in the user profile under Windows. In order to adopt these signatures, take a backup of these files from the old version or retrieve them. For this, browse to the folder ‘C:\Documents
and Settings\[User Name]\Application Data\Microsoft\Signatures' of the old system  or  the  backup  in  Windows Explorer under XP. In case of Vista or Windows 7, the folder is located in ‘C:\User\[User Name]\AppData\Roaming\Microsoft\Signatures’. Copy all the relevant fi les. There is a TXT, HTML and
RTF fi le for every signature so that it is compatible with various email formats.
              Go to the new system on which Outlook is installed. Depending on the OS, browse to the relevant data folder and copy the saved signature files. If a sub-folder is required and there isn't one, create it. The next time you compile a message, you will see the signatures again. For automatic application, open a new message. Click ‘Signature’ in the menu bar and then click ‘Signatures’. You can then select and edit signatures individually  in  the  next  dialog  box.  Define the default in the upper right combination fields. Under that, you can define different signatures for ‘New Messages’ and for ‘Replies/Forwards’. Repeat the process for all other mail accounts. Click ‘OK’ to apply the configuration.
NOTE:  You can use the same procedure to adopt templates from your old Outlook version. The required files are located in the ‘Templates’ sub-folder now instead of the ‘Signatures’ sub-folder but in the same location in the directory structure. Copy all the existing OFT files from there and paste them in the new system.
Read More...

Get a better overview of large Word documents in MS Word 2007,2010

By Saturday, October 22, 2011 , No comments
                 In  case  of  large  documents,you often end up scrolling up and down, especially when you are reviewing it.It becomes very difficult to go back to where you last were. In such a scenario, the ‘Thumbnail’ option as in Adobe can come  in  handy.  
                The  Thumbnails  option  is  available from Word 2007. In order to display it, go to  ‘View’  tab  from  the  main  menu  and then activate the option ‘Thumbnails’ from the ‘Show/Hide’ section. You will now see Thumbnails of pages on the left hand side, which you can easily browse through and also click on pages directly. Another option is the ‘Document Map’, which shows you the outline of the entire document.
                  Word  2010  incorporates  a  more powerful ‘Navigation Pane’, which can be reached via the ‘View’ tab. This pane usually appears on the left, but can be positioned anywhere by simply dragging it. The ‘Heading Tab’ will show you all the headings in the document as well as  sub-headings  for  ease  of  navigation. You can easily go to the desired part of  the  document  by  clicking  on  the corresponding heading in the navigation pane. You can even shift text from here by simply dragging the heading to the desired location. Next up is the ‘Thumbnail View’ that displays the thumbnail  images  of  each  page  in  the document, which makes it easy to jump from one page to another. The third tab is the ‘Search Option’ which displays the search  result  in  the  navigation  pane  while highlighting the search words or phrases in yellow. From there, you can directly jump to the relevant place with a click.
Read More...

Rotate tables - just swap columns and rows in MS Office Excel 2003,07,10

By Saturday, October 22, 2011 , No comments
                Sometimes after you are done creating tables in Excel, you realize that the columns could be better as rows and vice versa.

            PASTE SPECIAL AND TRANSPOSE:  First select the area whose columns and rows you want to swap.Then right-click the selected area and select ‘Copy’ or ‘Cut’, depending on whether you want to entirely replace the table or create a new one while keeping the original. Ensure that the area where you want to insert the table should be the same as the original. Next, right click and select the option ‘Paste Special’. In the dialog box that you see next, select the option Transpose, which you will find in the right-hand corner. Select ‘Ok’. Excel will now swap columns and rows.

Read More...

Saturday, October 15, 2011

Add useful functions to Windows Explorer

By Saturday, October 15, 2011 , , No comments
              You trust Windows Explorer when it comes to fi le management, but you still think a couple of useful functions are missing and want to know whether you can expand its functionality.
              FilerFrog  is  an  extremely  practical Shell extension for Windows Explorer. It is available for free, and can be downloaded from www.filerfrog.com.
               First unzip the ZIP archive and then run the relevant MSI installation fi le for your system since FilerFrog is available in 32 and 64-bit versions. The installation must be authorised via User Account Control. Then restart the computer so that the tool is integrated into Explorer.
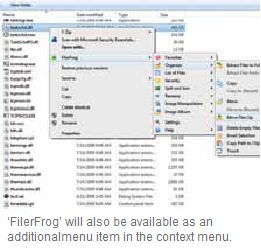
              ‘FilerFrog’  will  also  be  available  as  an additional  menu  item  in  the  context  menu of Windows Explorer. If you for instance want to sort a few fi les in a big folder, select them and then select the context command ‘Filerfrog | Organize | Extract Files to Folder’. Now enter a name for the new subfolder and click ‘OK’.
                The tool now creates this subfolder and moves all the selected fi les to it. You can also move the contents of individual subfolders into the higher level folder just as quickly. Just right click the subfolder(s)
or select the command ‘FilerFrog | Organize | Extract Files to Folder’. Confi rm the deletion of the empty sub-folder in the end with ‘Yes’. In the ‘Organize’ submenu, you can also copy and move fi les, or can copy the current path to clipboard. The ‘List of Files’ menu item  can be used to create fi le lists in various formats  and  save  them  as  text  or  HTML. This is extremely practical if you want to create and print a list of songs or videos.
                 Under ‘Security’, the tool provides a pre-programmed option of encrypting fi les or folders quickly and to protect them with a password. Data can be encrypted only on systems with FilerFrog. You can also split large fi les into predefi ned or random parts using ‘Split and Join’ if for instance you want to burn the
data  on  to  several  CDs.  In  the  ‘Rename’ menu item, the tool provides numerous options for complex renaming. You can thus set automatic numbering, set or attach specific text or delete a specifi ed number of characters from the name. Moreover, names can also be edited using ‘Find & Replace’. These functions are
useful  if  you  want  to  sort  the  fi les of a photo album for instance.

Read More...

Block updates temporarily with Service Pack 1

By Saturday, October 15, 2011 No comments
                  Long before the Service Pack 1 for Windows 7 appeared on the Internet,incomplete pre release versions were already circulating on the Internet,which must be uninstalled. You now want to disable automatic installation of the offi cial service pack in order to avoid any potential problems.
                  In order to activate automatic updates, use the free ‘Windows Service Pack Blocker Tool Kit’ from Microsoft (download from www.microsoft.com/downloads). Double-click the EXE archive file and select a target folder for unzipping it. The target folder will then contain the ‘SPreg.cmd’ script as well as the ‘NoSPUpdate’ guideline template along with the standard ‘SPBlockingTool. exe’ component. The actual function requires a registry entry. To do this manually, simply create a DWORD value with the name ‘DoNotAllowSP’ in the key ‘HKEY_LOCAL_MACHINE\SOFTWARE\Policies\Microsoft\Windows\
WindowsUpdate’. Then set the value to ‘1’.Users without administrative rights should right-click the fi le ‘SPBlockingTool.exe’ and select the context command ‘Run as Administrator’. Then confirm the User
Account Control query and also authorise the input by selecting an account with administrator rights and entering the relevant password. A message confirms the setup.
                   This setting blocks only the download via Windows Update but does not prevent a subsequent manual installation of the service pack. The installation is blocked for maximum 12 months after the release
of the service pack. During this time, you should test the installation on another computer and/or trace the reactions in the network and re-install the service pack at the earliest.
NOTE: The announced service pack is automatically distributed and installed via Windows Update Service. Immediate installation is however not necessary. The important security updates contained in it are automatically installed on the latest systems and compiled again into the service pack. You can usually wait for
modifi ed or advanced functions so that initial problems with the service pack can be identified and resolved in time. This is because it is often difficult to reset the installation of a service pack.
Read More...

Do not record file accesse

By Saturday, October 15, 2011 , , No comments
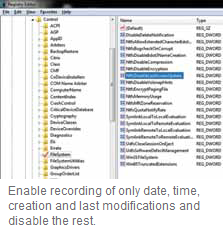
             NTFS logs the time of every fi le access. But you want only the date and time of  creation  and  last  modification, and want to disable the remaining functions.
               For this, enter ‘regedit’ in the input field of the start menu and press [Enter]. Then confi rm the security query of the User Account Control. Then browse to the ‘HKEY_LOCAL_MACHINE\SYSTEM\
CurrentControlSet\Control\FileSystem’ key in the Registry. In the right part of the dialog box, double click the DWORD value ‘NtfsDisableLastAccessUpdate’. Change it to ‘1’ to disable the saving of the time.This is a default setting on some systems. Confi rm the value with ‘OK’ and close the Registry. The access times are no longer logged after the system is restarted.

NOTE:  Logging all fi le accesses with the times is an extremely practical option for administrators from the point of view of security. As a normal user, you usually do not require these rules. Certain programs like defragmentation programs still use these values.
              The disabling should not be a problem. In  fact  it  should  accelerate  the  access  to large folders because it makes logging of writing  accesses  redundant.  It  is  also  less rough on SSDs.

Read More...

Get a changing desktop background without additional software

By Saturday, October 15, 2011 No comments
                  You want more variety on your desktop and thus want the wallpaper to keep changing every few minutes. Till now, you have been using a third-party tool, but Windows 7 can do this on its own.
                  Right click a free place on the desktop and select the context command ‘Personalize’. Click the
‘Desktop background’ link in the next dialog box. You can now select an image by clicking any one of the
thumbnails. Then simply click the next image for your future slideshow. As soon as you hover the cursor over
the image, an empty checkbox is displayed in the upper left corner.
                  Here, click to add a check mark for adding an image to the slideshow. You can repeat the process to add some more  images.  It  will  also  go  faster  if  you keep the [Ctrl] key pressed and then click the desired images one after the other or simply click ‘Select All’.
                 If  you  select  more  than  one  image, Windows activates the controls under the heading ‘Change image every…’. In this combination fi eld, select a time period between ‘10 seconds’ and ‘1 day’ after which the background image should change automatically. Enable the ‘Shuffle’ option if you want Windows to use images in a random sequence. In the ‘Image position’ combination field, define the display method of the wallpapers on the desktop. For example, Windows can increase the size of the image till it fills the entire desktop, maintaining the aspect ratio. Depending on the image format, the image is cropped from the upper to the lower edge. The ‘Stretch’ option is not very practical because Windows then stretches the image to the
desktop dimensions
Read More...

Set User Account Control settings individually

By Saturday, October 15, 2011 No comments
              The User Account Control (UAC) is a matter of dispute. In Vista, a user has the option of disabling it entirely. You wonder how it works in Windows 7.
               In Windows 7, you can select from four different User Account Control levels.For this, open ‘Start | Control Panel’ and then click ‘System and Security’ and ‘Security Center’. In the classic view of the control panel, you can go to this window directly via the ‘Security Center’ icon. Then click the ‘Change Settings of  User  Account  Control’  link  in  the left  side  of  the  window.  This  must  be confirmed via the User Account Control and must be authorized by selecting an account with administrator rights and
entering the password. You can now select  from  four  security  levels  of  the User Account Control in the next dialog box. For this, move the scroller to the desired setting using the mouse and confirm  with  ‘OK’.  This  must  also  be confirmed by means of an authentication via an administrator account.
                  The securest setting informs you about all changes made to the system settings that require administrator rights. For this, Windows dims the desktop out and you cannot access other applications till you decided about the changes to be made to the system settings. Microsoft calls this status ‘Safe Desktop Mode’.
                 The next level only provides information about attempts to make changes using external programs. As against that, if you make changes manually, they are ignored by this new User Account Control level. The third level functions exactly like the second but does not involve the dimming out of the desktop.
                The fourth level provides no more information and is completely automatic in  it  functioning:  If  you  are  logged  on  as the administrator, hackers or viruses can make easily system changes without any kind of control. If you are using a user account without administrator rights, Windows rejects all system changes
without any queries.
Read More...

Set up different views for open and closed folders in Explorer

By Saturday, October 15, 2011 No comments


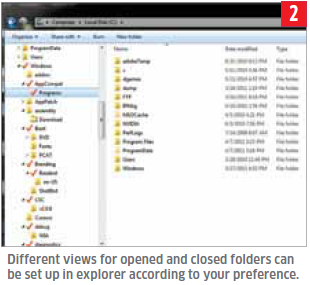
                 You do not find Windows’ way of displaying open and closed folders in the tree structure of Explorer clear enough. You thus want to use other, more meaningful icons.
                 For this, open the Registry Editor, click ‘Start’ and enter ‘regedit’ in the ‘Programs | Search Files’ field. You then see the search results directly in the start menu. Then right click ‘regedit.exe’ under ‘Programs’ and select the context command ‘Run as administrator’. This instruction must be confirmed via the Control Panel and authorized by selecting an account with administrator rights and entering the relevant password.
                 Then  browse  to  the  left  side  of  the editor in the tree structure to the key ‘HKEY_LOCAL_MACHINE\SOFTWARE\Microsoft\Windows\CurrentVersion\Explorer\Shell Icons’. Now right click a free point and select the context command ‘New | Character String’. Overwrite the name suggested by Windows  with  ‘4’  so  that  an  internal  key  is defi ned for the open folders. The closed 
folders are represented by the number ‘3’.
                 Open the new character string by double-clicking your entry and enter the complete path to the ‘shell32.dll’ fi le as ‘Value’. You can access the icons in this file by entering the internal index value of the desired icon right after the path and separating it with a comma. For instance, use ‘%SystemRoot%/system32\SHELL32.dll,144’ in order to replace the icon of an open folder with a red checkmark in Windows Explorer. 
                  After making these changes, close the Registry Editor with ‘File | Close’ and then restart the system.
                 Also, if you want to know which icons the file ‘shell32.dll’ contains, here is a small trick: Right click any folder and select the context command ‘Properties’. In the ‘Customize’ tab, click the ‘Choose icon’ button. The next dialog box displays all the icons from the ‘shell32.dll’ file. You still need to count the position of an icon in order to define its index value. Start with 0 and go in ascending order to reach the correct icon. Since Windows 7 lists icons in four rows, the second icon in the fi rst row has the number ‘4’.

Read More...

Trace and delete personal metadata from files

By Saturday, October 15, 2011 , No comments

               When  trying  to  manage a large  number of applications, private metadata tags such as your name, designation and other information manage to sneak into the fi le without being noticeable. You now want to check and clear this information before forwarding the files.
              In Windows Explorer, you can not only trace hidden additional data, but can also delete it. For this, browse to the relevant fi le, right click its entry and select the context command ‘Properties’. Then  go  to  the  ‘Details’  tab.  Depending on the selected file type, you will see a long list of information there that can be saved along with the file. Then, place the cursor  over  a  particular  specification in the ‘Value’ column. If this information can be changed, you will now see an input field or a combination field.
              There, you can change the value. If you  want to  just  delete  all  personal information, this method is a little cumbersome. In such a case, click the link ‘Delete Properties and Personal Information’. The option ‘Create a copy with all properties deleted’ is activated by default in  the next dialog box.If you retain it and click ‘OK’, a new file containing all the information is created as a backup.
Read More...

Monday, September 19, 2011

Back up data using an affordable cloud service( Amazon S3)

By Monday, September 19, 2011 , No comments
               The online storage service is not just for developers. You can use it as a cheap online backup location for all your important files.
               If you are looking for a simple, inexpensive online Web storage service, opt for Amazon S3. Contrary to the popular belief, this service from Amazon is not just for developers. It is equally useful  for  home  users.  It  can  be  used  to store your data like music fi les, videos, pictures etc or you can use it to back up your local hard drive. Instead of folders, there are buckets in which you can store your fi les. You have to select a region where you wish to store the bucket. Amazon  S3  is  available  in  US  Standard, EU (Ireland), US West (Northern California), Asia Pacific (Singapore), and Asia Pacific (Tokyo) regions. Select the region  closest  to  you  so  that  you  can save time and minimize cost. You can retrieve the fi les saved in the bucket via a unique developer assigned key. Amazon S3  is  also  very  cost  effective, as it functions on the policy that you pay only for what you consume.
Read More...

Adjust font size in the Firefox menu(Firefox)

By Monday, September 19, 2011 No comments
                   You need to increase the size of the text in Firefox's menu and tool bars, and the Windows controls aren't enough.
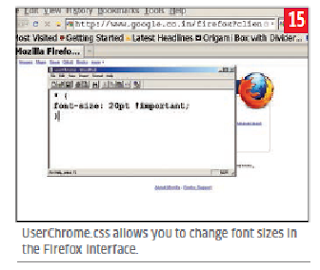
                 You can increase the font size of the fi le menu items and reduce the font size of the bookmarks if you find  it  to  be  too  large. Firefox  uses  the Windows default settings, so you could increase the DPI value of the system font size. Alternatively, you can customize the required settings by creating a 'userChrome.css' file instead. You can find the sample file at ‘C:\Documents and Settings\\Application Data\
Mozilla\Firefox\Profiles\j53h8g9g.default\chrome'. For example, to set the font size to 20 px for all elements of the Firefox interface, add the line '* {font-size: 20pt !important}'.You can also edit individual elements, but for that, you will have to locate the correct CSS selectors. For more samples of CSS codes, visit http://
www.mozilla.org/unix/customizing.html
Read More...

Configure multifunctional homepage(Chrome 4.x onwards)

By Monday, September 19, 2011 No comments
                  In Chrome, the automatically generated selection for new tabs is really practical. Still, you can customize the homepage in the browser for quick selection and other functions. A free Chrome extension called Incredible Start page helps you confi gure your Chrome homepage.
                   You can customize Chrome to your liking with the free Incredible Start page extension, which you can easily find online. Once you reach the extensions page, confirm the installation and allow access  to  personal  data  by  clicking ‘Install’. Now open a new tab. To the left, you will see a list of the last closed tabs as  well  as  the  bookmarks.  To  the  right, the large field of ers a quick selection for a specific  folder  of  bookmarks.  To  change the displayed contents, navigate to the desired bookmark folder, and click ‘Show as main’ button at the base of the dialog. Other bookmarks can also be added to the right via drag-and-drop.
                 You can personalize colors and the background  image  by  clicking  ‘Theme Options’. To use your own picture, click ‘Custom’ under ‘Wallpapers’. In the next dialog box, enter the URL of the desired photo and confirm with ‘Save’. You can also use photos from Flickr as a background. You can add notes for quick access on the yellow notepad that you can send to G mail or to Google calendar with the allocated links. With the ‘Advanced Options’ link, you can change the number of the recently closed tabs  that  should  be  visible  on  the  page in the ‘Maximum recently closed tabs’ combination fi eld.

Read More...

The Office Menu 2010 offers many features, but often not where you want it. However, you can customize the menu to your style of working.( Office 2010)

By Monday, September 19, 2011 , No comments
                   The Office Menu 2010 offers many features, but often not where you want it. However, you can customize the menu  to  your  style  of  working.
                From  version  2010  onwards, you can set up the menu in all Office applications individually. To do so, open ‘File | Options’ and click on ‘Customize Ribbon’ from the options displayed on the left.
                You can even customize the standard commands to a certain extent. To do so, select  ‘All  Tabs’  in  both  the  combo-box sets. The section ‘Main Tab’ defines the available tabs. Individual commands are organized into groups and to display them, click on the plus sign in front of  the relevant tabs. You can then move the selected group by a simple drag-and drop action. But before that, you will have to create a new group, as you cannot add a command to the existing groups. Creating a new group is fairly simple; all you  have  to  do  is  right-click  at  the  desired place and then click on ‘New Group’. You can even rename the group that you have  created.  For  example,  in  Excel,  the group ‘Macros’ is in the tab ‘View’. For immediate access, you can move this to the ‘Start’ tab.

Read More...

Define specific cells as per the maximum value( Microsoft Excel)

By Monday, September 19, 2011 , No comments
                 You want to display the content of one result  cell  in  another  which  is  to  the left of the relevant maximum value of a specific data fi eld in the table sheet.
                 This task can be carried out using a combination of three simple functions.The functions are used in one single formula. Just imagine: The fields “B1” to “B4”  contain  four  numbers.  If  the  largest number  is  in  “B3”,  the  result  cell  should return the value from “A3”. For this, enter the formula given here:
=INDEX(A1:A4,
MATCH(MAX(B1:B4),B1:B4,0),1)
“MAX(B1:B4) first identifies the largest value from the data set. This value serves as a search criterion for the comparison that is extended to the search matrix “B1:B4”. With the comparison type “0”, the function identifies the position of the first value from the search matrix that is identical to the search criteria.
                The matrix variant of the “INDEX” function then uses the searched value from the value matrix “A1:A4” that is located in the fi rst column of the row defined by the comparison.
Read More...

Display hidden data on the server( Filezilla)

By Monday, September 19, 2011 No comments
                   An FTP client normally shows no hidden files on the connected server whose name starts with a leading point.  However,  if  you  need  to  access  a  file with the name ‘. htaccess’, the FTP client Filezilla can be forced to display the hidden fi les on the server.
                 If you want to see the hidden files on the connected server, you can easily do so by a simple click.  If  you  are  using version 3.x, select ‘Server’ from the menu bar, click the option ‘Force show hidden files’.If you are using version 2.x instead, go to ‘View’. Here you will fi nd the option to  show  hidden  files.
Read More...

Create e-mail signatures with text and images(Thunderbird)

By Monday, September 19, 2011 No comments
                Instead of a signature that just contains the sender details, it’s possible to create a sophisticated signature with an image or logo.
              Thunderbird supports text-based signatures, but if you need images togo  with  your  signature,  you  will  have  to code it as an  HTML  file. You can use the Word  editor  to  arrange  your  image  and
text settings. Save the fi le as a webpage.Next, open Thunderbird, ‘Tools | Account Settings’.  Next,  select  the  e-mail  account to add the signature. Now, select the‘attach the signature from a fi le instead’and select the created HTML file. For this to  work,  make  sure  that  the  messages are being sent in HTML format. To enable,click on ‘Composition & Addressing’ on the left. Enable the ‘write messages in HTML format’ option and click OK.
               If your image is not showing up in the signature,you  will  have to convert  the image to base64 strings. The process converts the image into its original base code that can be incorporated into  an  HTML  file. To convert the image,go to http://webcodertools.com/imagetobase64converter. Load the image, and replace the image in the HTML fi le with the contents appearing in the Image tag text box, and save the
file. The image will then appear in yourselected signature.
Read More...

Install new fonts and manage them centrally

By Monday, September 19, 2011 , No comments
                 Windows 7 has a wide range of fonts but they are still not enough for some users. Unfortunately, a command for installing more fonts is not available in the font folder at fi rst glance.
                 In  order  to  configure fonts, click ‘Appearance and Personalization’ in the Control Panel and then ‘Fonts’. In this view, every entry already has a mini preview of the relevant font.
                 There are several options for installing new  font  types.  It  is  usually enough  to copy the new font file into the folder ‘C:\Windows\Fonts’. The disadvantage of this method is that only the file name and not the font name is later displayed in applications. It  is  thus  better to select one of the following procedures: Open the folder with the desired font file in Windows Explorer. Right click the file entry and select the context command ‘Install’. Even the preview window of the font type which opens on double clicking has an ‘Install’ button. A click on it integrates the font into the system.
                 The other option is to open the Fonts folder and press [Alt]. Windows then displays the menu bar. Click ‘New Font’ in the ‘File’ menu, navigate to where the new font is saved and open the file.
                 You can also uninstall fonts via the ‘Fonts’ folder, for example, using the context menu command ‘Delete’. System-relevant ones are an exception. Today’s computers are so potent that system performance is not affected even if a lot of fonts are installed.
                 If  you just want to reduce the number fonts displayed in the selection lists,you can simply deactivate the unused ones. These  then continue to be in the system but cannot be used.For this,right click the entry and select the context command ‘Hide’. You can reactivate the font at a later time using the context command ‘Show’. But unfortunately, not all programs respect this option. Microsoft Office 2010  continues to display all fonts.  
Read More...

Define the actual folders hidden behind shortcuts

By Monday, September 19, 2011 , No comments
              From Vista onwards, specific folders seem exist for the sake of compatibility, but actually redirect 
to other real folders. This messes up scripts and batch fi les you’ve written yourself.
             These shortcuts, called junction points, exist throughout Windows.For example, programs can 
try to save data to the old ‘Documents and Settings’ folder, but will be seamlessly redirected to the applicable new ‘Users’ folder. The operating system however hides this persistently. Attempts to access the junction points directly (Windows  displays  them  if  you  enable the display of the system fi les via the folder options) are aborted with an error message. And another stumbling block  is  that  real  folder  names  need to  be  used  in  scripts  or  batch  files. Else,  they  hang  during  execution.
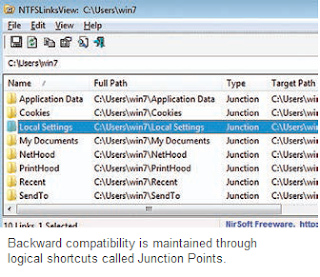
             The free tool NTFSLinks-View provides 
help. It lists the active junctions in the system. Download the program from 
www.nirsoft.net/utils/ntfs_links_view.html. The tool ‘nftslinksview.exe’ can immediately be started. The program lists all active junctions in the folder of your user profile.
              In the ‘Target Path’ column, it displays the relevant real folder which the junction controls in the ‘Full Path’ column. Right click an entry and select the context command ‘Open Target Path’ to open this  target  folder  in  Explorer. 
              In order to check other directories, enter the folder in the input fi eld, e.g. ‘C’ and click ‘Go’. Use the key combination [Ctrl]+[A] to select all entries and then ‘Save’  them  to  a  text  fi le using ‘File I Save 
selected items’.

Read More...

Add data types to hard drive cleaning

By Monday, September 19, 2011 No comments
                 Hard drive cleaning helps in tracking trash on the system. Unfortunately, the functionality is restricted to predefined file types.
            You can add more data types for this function to clean out. For this,right click a free place on the desktop and select ‘New | Shortcut’. Enter the following command in the ‘Item location’ input field:
C:\windows\system32\cmd.exe 
/c cleanmgr /sageset:4711 & 
cleanmgr /sagerun:4711
and confirm with ‘Next’. On the second page, define a name for the new link such as ‘Hard drive cleaning selection’. Then click ‘Finish’. If you use this link to run the Disk Cleanup utility in the future, you will see more entries such as ‘Old CHKDSK fi les’, ‘Setup log fi les’, ‘System error memory dump fi les’ and ‘Log fi les
for Windows Upgrades’ for selection.The command behind this link makes Windows call up the hard drive cleaning utility  ‘cleanmgr.exe’  twice,  with  different start options. First with ‘/sageset’ and then with ‘sagerun’. The number after the start options must always be identical
and must be between 1 and 65535.
             The option ‘sageset’ results in Windows opening the ‘Settings for cleaning  the  hard  drive’  dialog  box  in which the drive cleaning settings can be configured. The system then saves this configuration in the registry under the specified number. The option ‘/sagerun’ then executes the configuration saved under the specified number.
Read More...

Hide unused libraries in Windows Explorer

By Monday, September 19, 2011 No comments
              The Libraries function in Windows 7 help in structuring data. But a lot of users still prefer the conventional folder structure.
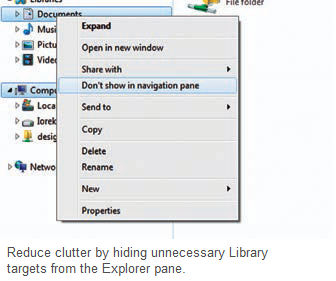
              In such a case, you can hide the libraries and thus make space for displaying more folders. For this, right click the first library ‘Pictures’ and select the context command ‘Do not display in navigation field’.Repeat  this  step  for all other unused libraries. In order to display individual entries again, click ‘Libraries’ in Explorer. Then right click the desired element and select the context command ‘Display in navigation field’.
              The main entry ‘Libraries’ cannot be deleted so easily. To do this, a detour Additional clocks can be placed in the system tray to help you work better with international clients.3Add the cool Expose feature to Windows XP with this simple free tool.via the registry is necessary. Type ‘regedit’ in the search fi eld of the Start menu, press Enter, and confirm the user account control prompt by clicking ‘Yes’. Now navigate to the key‘HKEY_LOCAL_MACHINE\SOFTWARE\Microsoft\Windows\CurrentVersion\Explorer\Desktop\NameSpace’. Then select the sub-key ‘{O31E48257B94-4dc3-B131-E946B44C8DD5}’ and open ‘File | Export’. Then select a safe storage location, enter a file  name  such  as  ‘Explorerlibraries’ and  click  ‘Save’.  This  is  to  back  up  the entry. Then simply delete the subkey in the Registry Editor and confirm with ‘Yes’. Now close the registry and restart Windows Explorer. A system restart is not required.
             In order to display the libraries again, double click the exported REG file and confirm the requests for user account control and adding values into the registry with ‘Yes’. The libraries will be visible once again the next time you start Explorer.


Read More...

Switch between applications quickly with Apple’s Expose function

By Monday, September 19, 2011 , , No comments
             When you flick the cursor to a specific corner of  the  monitor, Expose  shows thumbnails of all active programs minimized on the desktop.You can then  uickly  switch to another application – but only on Mac OS X.
              The  tool  SmallWindows  equips Windows with the practical Expose functionality of Mac OS X. Small Windows has two functions: It either minimizes all  windows  so  that  it  is  easy  to  toggle between applications, or it moves all windows  to  the  screen  border  so  that  you get a free view of the desktop. You can download it from http://smallwindows.sourceforge.net.  A  wizard  guides  you through the setup. Under Vista and Windows 7, you need to authorize the installation by selecting a user account with administrator rights and entering the relevant password if needed.
           At the time of the fi rst start, configure the program asks whether Windows should automatically load it during startup  so  that  it  is  at  your  disposal immediately, so confirm the query with ‘Yes’. After the start, a new icon is displayed in the system notifi cation area. Right click it and select the context command ‘Settings’ to open the dialog box for configuring the application. Here you can also deactivate the automatic start during system start by removing the checkmark on ‘Start when Windows starts’.
            The hot zones are the four corners of the desktop via which you can activate SmallWindows. For every hot zone, define a reaction using the relevant field. In  case  of  all  ‘All’,  Windows  displays  all the open programs in one minimized view. You can select a program with just a click and bring it into foreground. You can deactivate the function with ‘None’. ‘Desktop’ moves all windows to the screen border and gives a free view of the desktop. ‘Related’ minimizes the current program. This function is however of  no  use  otherwise.  In  addition  to  flicking the mouse, you can also defi ne key combinations for individual functions via ‘Hotkey Activation’.
Read More...

Get a constant overview of several time zones

By Monday, September 19, 2011 , No comments
                     When  making  a  call  to  another  country such  as  the  USA,  you  don’t  want  to inadvertently wake someone up in the middle of the night. But this can actually happen if you do not pay attention to the time difference.
              Windows provides help in displaying  several  time  zones.  Click the clock to the right of the taskbar.
A window with an analog clock and a calendar is displayed. Use the ‘Change Date and Time Settings’ link in this window. The ‘Date and Time’ dialog box
opens. Activate the ‘Additional times’ tab in it. This tab can be opened via the control panel as well as via the ‘Time, Language and Region’ and ‘Add times for different time zones’.
              Alternatively, in the classic view of the Control Panel, double click ‘Date and Time’ and activate the ‘Additional Times’ tab. You can define  up  to  two more time zones that Windows then displays near the analog clock with the local time. For this, there are two ‘Display this time’ fi elds in the ‘Additional Times’ tab. Checkmark the heading to activate the field. You can then select ‘Select time zone’ and ‘Enter display name’ with the help of which you can later identify the time zone. The country name would be an ideal entry. Repeat these settings for the third time if required and confirm with ‘OK’.
               Now after clicking the taskbar clock,Windows will show both additional time zones. If you simply hover the cursor over the time, a small tooltip with the current date and the various times is displayed.
Read More...

Defragment several disks automatically without monitoring

By Monday, September 19, 2011 , , No comments
                 Regular defragmentation keeps the system performance consistent. But you cannot sit at your PC through this entire  process.  What  is  also irritating is that defragmentation needs to be manually activated if there are several hard disks.
                 The graphical interface of Windows’ defragmenter does not provide the option to process several drives one
after the other, at least under XP. What a lot  of  people  don’t  know  is  that  Windows has an additional command line tool called  ‘defrag.exe’  that  is  suitable  for batch processing as well. You can use it to automate the defragmentation of several drives. If you operate a system with the drives C, D and E for instance, enter the following in Notepad:
@echo off
defrag.exe -f c
defrag.exe -f d
defrag.exe -f e
Save the fi le as ‘defrag.cmd’. If you are using other drive names or more drives, change the file accordingly. Double click this fi le to defragment all hard disk partitions one after the other automatically without a break. However you need to be logged in with administrator rights for running the file. The used parameter ‘-f’ carries out the defragmentation even if the hard disk hasless than 10 percent free space, without pausing for an error message. But the process takes too long in that case. What you can do is delete the large fi les that are no longer required.
                  Vista and Windows 7 regulate defragmentation automatically on the basis of a schedule. Irrespective of that, you can either use the batch processing operation via ‘defrag.exe’ or even select several drives simultaneously with the graphical interface.
                  For this, right click a drive entry (e.g.in Explorer) for both the versions, select
the context command ‘Properties’, activate the tab ‘Tools’ and then click the ‘Defragment now’ button. Under Vista, click the ‘Select Volumes’ button and you can then activate several drives for defragmentation or select ‘Select all data carriers’. Under Win7, keep the [Ctrl] key pressed and then select the desired drives by clicking the entries one after the other.


Read More...

Switch off Aero interface automatically or programspecifically

By Monday, September 19, 2011 No comments
               You need to switch of  the Aero efects  in Windows for taking screenshots or for some games, but using the display properties dialog box each time is extremely tedious.
          You  can  automate  this  task  by means of a property in the shortcut with which you can call up a specific program,  such  as  the  Screenshot  tool. The programs get more graphics power when  the  Aero  is  switched  of . The PC thus has a little more breathing room in case of intensive graphics applications such as games.
          Search  for  the  link  to  call  up  the relevant program on the Desktop or in the Start menu. Right click it and select the context command ‘Properties’. Then switch to the ‘Compatibility’ tab and activate the option ‘Disable desktop composition’ in the ‘Settings’ area.
          Confirm this change with ‘OK’. After this, Windows automatically switches to the ‘Windows 7 Basic’ color scheme when you start the relevant program.Windows automatically switches back to  the  previous  scheme  as  soon  as  you close the program.
             NOTE:  When  calling  up  Windows’  built-in components, it is not possible to set compatibility options. A shortcut to ‘notepad.exe’  is  thus  not  suitable  for this trick.

Read More...

THE WINDOWS TRICKS Headline Animator