Here are some interesting Operating system and softwares tips and tricks 4u.JUST CLICK ON THE PICTURE IN THE BLOG FOR ENALARGED VIEW.

sd
Showing posts with label Application. Show all posts

Tuesday, March 6, 2012

Set the time when the photograph was taken as the name of the photograph(Namexif 1.5)

             When you transfer photos from a camera to your PC, the files have cryptic names. You want to name the photos with the date and exact time.
              Download Namexif from digicamsoft.com and just save the installation file “Namexif.exe” in any of the folders or directly on desktop.
              Start the tool with a double click on the file entry in Windows Explorer. For newer versions of Windows, you will have to authorize these instructions by selecting a user account with administration rights and enter the related username. Finally click “Next” and confirm the license agreement. You will have to repeat this procedure each time you call up this application.
              Now you can add single photos with “Add files” or an entire folder with “Add Dir”. You can delete entries from the list with “Clear list”. However, keep in mind that you cannot remove individual entries. As a final step, click “Next”.
              Now specify the format you wish to rename the photos on the next page. Here, "YYYY" stands for year, “DD” for date and “HH” for hour. Furthermore, you can keep the date, time and the original name of the file or rename it. If you wish to retain the original name then select the option “Add original name at the end”. If you want to specify any other ending, then select “Add name (suffix)” and add the desired name in the following box. However, do not use both these functions together.
              With the “Shift time by” option you change the time zone by adding or subtracting time. This is especially handy when you have pictures that you clicked while on a trip abroad, but forgot to calibrate the camera time with the local time there.
Read More...

Sunday, February 19, 2012

Tracking free podcasts and archiving them locally(iTunes)

By Sunday, February 19, 2012 , No comments
            Podcasts have established themselves as an information platform. A lot of this interesting content is available free of cost. But what is the best way to fi nd these podcasts? Can they be managed on an iPod?
            A good drop-in center for podcasts is the iTunes store and they come free. Open the iTunes store in iTunes and click ‘Podcasts’. A hit parade to the right shows the most popular elements. A click on a podcast delivers detailed information. You can select individual issues or ‘Subscribe for free’ with a mouse click. iTunes then sees to it that the new issues are automatically loaded in the future.
             Even the pan-program search is good for rummaging around. You can fi lter results found according to the medium type and click ‘Podcasts’. You will later find the downloaded fi les in the mediatheque.
            iTunes not only ensures that new podcasts are automatically fetched in the subscriptions, but also automatically deletes the older issues of a podcast after a certain time or after it has been played. This is useful to prevent the mediatheque from growing too big. However, if you want to preserve certain files for a longer time, adjust the relevant setting accordingly. For this, open the podcasts in the mediatheque and click ‘Settings’. In the ‘Settings for’ combination field, fi rst select ‘Podcasts (Standard)’ and determine the general behaviour. We recommend that you do not change the ‘Load latest’ setting. You will automatically get new parts now. The value in ‘Preserve issues’ is important. Decide if you want to preserve ‘All issues’ or only a specific number of last parts. Finally, you can also select a single podcast under ‘Settings for’, so that you can additionally assign deviating settings to it. Confirm with ‘OK’. Then check the delete permit in the context menu of the single podcast. If ‘Disallow automatic deletion’ is selected, the contents are preserved despite making changes in the settings. Select the ‘Allow automatic deletion’ context command so that these changed settings take effect.
Read More...

Converting handwriting in your own TrueType font(YourFonts)

By Sunday, February 19, 2012 No comments
          In addition to the fonts available in Windows, you want to use your own handwriting as a font.
          There are different ways to integrate your own handwriting into your system. The chief task is to make a font out of it. This is where the online service yourfonts.com helps you. The price for your own font is about $10. Before you buy the font, you can test it online.
           Go to www.yourfonts.com and click ‘Print Template’. On the next page, follow the link ‘Template as PDF document A4’ and take a printout. Write all alphabets separately in the specified fi elds. Be careful when it comes to lateral benchmarks, which show the alphabet height, the intermediate line, the base line as well as the line for descenders one after the other. The alphabets should be straight and in the centre of the field. They should also be aligned to the lines and should be written with the same stroke width on the page. At the bottom right in ‘Signature’, you can give your signature, which can later be inserted in a document later by pressing a key. We recommend not doing this and advise you to use a self-scanned graphics fi le instead.
           Scan the page in color or grayscale. Ensure that the position is correct and the resolution is 300 dpi. All crosshatch lines must be covered fully and be clearly visible. They must not be overwritten. Save the graphic as a JPG or TIF file.
             Now click ‘Upload template’ on the website. Navigate to the scanned file and select it. After the upload, the website generates the font within a minute and gives you a preview. In the input field, you can type any text and view it in this font. If the result does not correspond to your idea, repeat the process till you are satisfied. Click ‘Download’ and ‘Buy now’. You can pay via PayPal, or credit card.
              Install the downloaded font fi le in the system. In Vista and Windows 7, type ‘font’ in the search field of the start menu and open the ‘Font types’ entry in the result area. Press [Alt] and open ‘Install New Font type’. In the dialog, navigate to the storage location of your own font and select it. Ensure that the ‘Copy the font types in folder ‘Fonts’’ option is checked and click ‘Install’. You can now use your own font in all applications.
NOTE: You can also use this method to create a font with special symbols or special characters. But you cannot create a font with photos or color graphics. They look like vectorized font characters in black and white.
Read More...

Sunday, February 5, 2012

Checking the ‘fingerprint’ of your own system(APPLICATIONS)

By Sunday, February 05, 2012 No comments
            When surfi ng on the Internet, you have doubts that your surfi ng habits are being spied on by the websites you are visiting. Hence, you wish to check what data is being revealed by the browser without being asked and to what extent it is suitable for identifi cation and tracking.
            Even if you do not reveal any personal data via cookies or direct inputs to a website, the data transmitted by the browser can be enough to identify the PC. The following is applicable in the process: the more customized the configuration of the browser and computer, the easier it is for a website to detect that it is the same computer again, without even knowing the personal data.
             The Panoptic lick project determines how unique your computer-browser combination is using statistical figures. You thus get an idea how visible you are on the Internet.
             In order to test this, go to http://panopticlick.eff.org and click ‘Test me’ there. The following analysis shows which information can be read out by the website and how specifi c this confi guration is. The table containing the individual components shows the data reported by your browser and also how important the information content in it is. Most of the special features are due to the browser plug-ins and fonts of the PC. At present, you can do little to prevent this information transmission. It is advisable to use the latest version of a common browser and install only the necessary plug-ins and fonts. From now on, the private mode of the browser should also ensure simplifi ed and standardized data transmission to the user-agent and plug-ins. Switching off Javascript completely is the most eff ective option since the detection of plug-ins and fonts is prevented. If you use Firefox, you can block the function to a great extent using the ‘NoScript’ tool. You can get more information at http://panopticlick.eff.org/self-defense.php.
BACKGROUND: Purely from the statistical point of view, about 33 bit of independent information is required (233) to distinguish all the 6 billion people. If the sex is known, for instance, it provides one bit information, because it is relevant for every second person on an average. In addition, if the birth date is known without the year, it is true of just every 365th person. The same principle also applies to the data from browser information. Detailed information on this topic can be found at https://www.eff.org/deeplinks/2010/01/primerinformation-theory-and-privacy.
Read More...

Thursday, January 26, 2012

Make caricatures out of your own photos(Photoshop CS 2, 3, 4)

By Thursday, January 26, 2012 , No comments
            The year is over and the birthday is just around the corner. You want to have your own party. The invitation that you have created on the PC should be equally enticing.
            In addition to settings for tonal value corrections, poor horizons and depths/light dialogs, you can also use Photoshop to have fun and alienate pictures. An image with a right background is ideal for a start since it gives you a lot of freedom.
EDIT HEADS: Open the image and create the level ‘Body’. In the 100% view, select the head using the magnetic lasso. In the option bar, adjust the ‘Soft edge’ with a width of ‘1 px’. Use [Ctrl]+[X] to cut the head from the image and use [Ctrl]+[V] to paste it at a new level which is automatically created by the program. Use ‘Image | Transform | Free transformation’ to increase it to 200% and move and turn it into the position. Now activate ‘Filter | Distortion fi lter | Fuse’ and the ‘Blow up’ tool. The values for ‘Tool tip’ and ‘Tool pressure’ depend on the resolution, e.g. ‘30’ and ‘50’ would be right. They stand out with just a few clicks of the eyes. FORMING WIDE SHOULDERS: Just like the head, now select the upper body in the ‘Body’ level. Cut and paste it back into the image using ‘Edit | Paste’. Photoshop creates a new level, which you rename as ‘Shirt’ in the level pallet. Now go to ‘Image | Transform | Distort’. Move the shirt to the suitable height, click one after the other at the upper corner of the selection, and pull it away from each other and upwards. Due to the distortion, the upper body looks blown up with superhero shoulders. You should also do a little trial and error with the settings till you have attained the desired result.
MAKE THE LEGS SHORTER: The photo becomes funny when you shorten the legs in the V form downwards. Use the distortion fi lter for this.
Read More...

Determine the last day of the month easily using integrated function(Excel XP, 2003, 2007)

By Thursday, January 26, 2012 , No comments
            You often need to check the last day of a particular month for due dates and deadlines. You want to automate this determination of the right date in order to avoid any errors caused due to leap years, for example.
           The table function ‘EOMONTH’ helps in calculating the correct date. In the older versions of Excel, you always need to enable this option first. For this, open ‘Tools | Add-ins’, enable the option ‘Analysis Functions’ and confirm the dialog with ‘Ok’.
            The two criteria required for the ‘EOMONTH’ function are a predefined date and a whole-number diff erence in months. For example, in order to determine the last day of the current month, on the current date in case of stock market orders, you can use
=eomonth(today(),0)
             The argument ‘0’ must also be specified if no other month is desired. A due date at the end of February 2012 can be calculated using the formula
=eomonth(date(2012,2,1),0)
              What is practical here is that you don’t need to think whether a year is a leap year. The last day of a month can be calculated even three months after a particular day thanks to the function =eomonth(‘10.1.2010’,3) 
            Here, ‘10.1.2010’ is the reference date, ‘3’ stands for the last day of the fourth month from today
Read More...

Right-click to scroll back during live presentations(PowerPoint 2003, 2007)

By Thursday, January 26, 2012 , No comments
             Controlling a presentation using wireless mouse is practical. Clicking the left mouse button takes you to the next slide, but right-clicking only displays the context menu, whereas you want to scroll back with it.
             You can disable the display of the context menu. For this, go to PowerPoint 2003 and open ‘Tools | Options’ and disable the ‘Show menu on right mouse click’ option in the ‘Slide show’ field under the ‘View’ tab. Once you have confirmed this change with ‘Ok’, rightclicking will always take you back to the previous slide during presentations. You can also enable this option again if you right-click to display the context menu.
           In PowerPoint 2007, click on the Office button, select ‘PowerPoint Options’ and then the category ‘Advanced’ to the left. This contains the ‘Show menu on right mouse click’ option in the ‘Slide show’ field.
Read More...

Quick presentation of data using color graphics and symbols(Excel 2007)

By Thursday, January 26, 2012 , No comments
              Diagrams help in explaining the data and relations in large tables. But they also take up extra space in the data sheets.
              Excel supports conditional formatting of data cells, which helps in increasing the visual presentation of values. Till now, the options for this were limited, but with the 2007 version, Excel has expanded the conditional formatting so that you can often do without additional diagrams. Select a data field to be presented by Excel and click on ‘Conditional Formatting’ in the ‘Home’ tab in the multi-function toolbar. Position the cursor on the ‘Color Scales’ and then click on one of the symbolized color gradients. All the selected cells thus get a gradational background color that depends on the relevant numeric value. Excel automatically determines the required value range so that the color scale with the default values is sufficient in a lot of cases.
               The conditional formatting is equally easy for ‘Data bars’ in the relevant color as well as for ‘Symbol sets’, wherein you can choose from a wide range of variants. This includes signal symbols, tendency arrows or level indicators. Several variants can also be combined with each other as long as the presentation is not impractical.
             The default setting of the color scale is not always suitable, especially in tables containing just one or a few outliers, i.e. high or low values. In such a case, you can define for yourself which values should have which format. Select ‘Conditional Formatting | Color scales | More rules’ or ‘Conditional Formatting | More rules’. The ‘New Formatting rows’ dialog provides access to all settings. Set the row type to ‘Format all cells as per their values’. In the combination fi eld ‘Format type’, change the setting to ‘3-color scale’, for instance. All further options are automatically changed to the relevant elements. Now, define further configuration for Minimum, Average and Maximum separately. For Average, the type ‘Percentile’ with a value of ‘50’ percent is often practical. For linear or absolute scaling, you can also select the ‘Percent’ or ‘Number’ type and provide it with suitable values.
Read More...

Checking automatic formatting of tables just got better(Word XP, 2003, 2007)

By Thursday, January 26, 2012 , No comments
            Text processing automatically formats tables when pasting and editing. Well meant, but the result is often not what the user desires.
            Automatic formatting is definitely useful for creating simple tables. However the same cannot be said when it comes to complex dimensions and indents to the right. In order to disable this function, right-click on the relevant place in the table and select the context command ‘Table Properties’. Click on ‘Options’ in the ‘Table’ tab. Uncheck the checkbox ‘Allow automatic changes in size’ and confirm all the open dialogs with ‘Ok’.
           The function for automatic adjustment of the entire width, on the other hand, is practical and can also be run manually. For this, right-click on the relevant table and select the command ‘AutoFit | AutoFit to Windows’ in the content menu. The table thus gets automatically formatted as per the total width of the text mirror. This value is retained even if the individual column widths are subsequently changed. NOTE: Unexpected text formatting within the table is mostly caused by format templates. In such cases, it is better for you to select the entire table and then click on the combination fi eld of the format templates in the ‘Format’ toolbar. Then open the ‘Clear formatting’ command in it and then re-insert the table.
Read More...

Customized numbering for pages in one single document(Word XP, 2003, 2007)

By Thursday, January 26, 2012 , No comments
              In addition to the table of contents, large documents often require special numbering. For example, the page numbers start only after the cover page or the table of contents has Roman numbers.
             Word can divide documents into sections, e.g. cover page, table of contents and text, which can either have separate numbering or numbering continued from the previous section. The method in different program versions is not very different from each other.
             Position the cursor between the cover page and the table of contents in the document. Then, in the multi-function toolbar of Word 2007, select ‘Page Setup | Page Layout | Breaks | Next page’. In the older versions of Word, open ‘Insert | Break’ and in the following ‘Section Break Types’ dialog, select the option ‘Next page’. Then click on ‘Ok’. If required, delete all manually inserted page breaks and then separate the table of contents from the actual text with the help of another section break.
             Position the cursor in the table of contents and click ‘Header’ or ‘Footer’ in the ‘Insert’ tab of the multi-function toolbar. In the older versions, open ‘View | Header and Footer’. Word first goes into the header and you can go to the footer using the ‘Switch between header and footer’ option in the now visible, floating toolbar. In order to have a header and footer that is different from the previous section, disable the ‘Link to previous’ option in ‘Design’ under ‘Navigation’. In Word 2003 and XP, disable the ‘Link to previous’ or the ‘Same as previous’ option.
             You can now add the desired header and footer. To add page numbers, place the cursor where you want to enter the page number and click on ‘Page number’ under ‘Header and Footer’ in the ‘Design’ tab of the multi-function toolbar. Click on ‘Page number’ and select ‘Format page numbers’. In the older versions of Word,enter the page numbers using the ‘Insert Page Number’ command in the floating toolbar.
               The next dialog is the same for all versions of MS Word. Under ‘Page Number Format’, define the required format of the page numbers, e.g. Arabic or Roman. Also enable ‘Start at’ and select ‘1’ in the following fi eld so that Word starts the numbering pages of that particular section with 1. An alternate option is to select the ‘Continue previous list’ option. After this, confirm with ‘Ok’ and click on ‘Close Header and Footer’ or ‘Close’. Repeat the same steps if you would like to use any other number formats.
Read More...

Saturday, January 14, 2012

Using tabbed browsing again without restrictions(Internet Explorer 7)

By Saturday, January 14, 2012 , No comments
              In the browser, several websites can be managed at a time using tabs. Although you have not changed the settings at all, the command ‘New tab’ is nowhere to be seen in the File menu.
              It is perhaps other system settings that are blocking the tab browsing with Internet Explorer. In XP Professional, you can solve the problem with the Group Policy Editor.
              For that, select ‘Run’ in the start menu, enter ‘gpedit.msc’ and press Enter. Navigate to the left in structure to ‘User configuration | Administrative Templates | Windows Components | Windows Explorer’. On the right-side of the window, search for ‘turn on Classic Shell’. If this guideline is activated, it blocks the display of tabs in Internet Explorer. To correct, double-click on it and change the setting in ‘Deactivated’ or ‘Not configured’. Navigate further in the structure to ‘User Configuration | Administrative Templates | Windows Components | Internet Explorer’. On the bottom right of the list, search for the guideline ‘Turn offtabbed browsing’. Set this as well to ‘Deactivated’ or ‘Not configured’.
             In XP Home, you must look for the corresponding registry entries and change them. For that, select ‘Run’ in the start menu, enter ‘regedit’ and click ‘OK’. Then navigate in the RegistryEditor to the key ‘HKEY_CURRENT_USER\Software\ Microsoft\Windows\CurrentVersion\ Policies\Explorer’. Search for the DWORD value ‘ClassicShell’ on the right side. If it is available, remove it with ‘Edit | Delete’ and confirm the security query with ‘Yes’. Then navigate further to the key ‘HKEY_ CURRENT_USER\Software\Policies\ Microsoft\’. Check here, whether the subkey ‘Internet Explorer\TabbedBrowsing’ is available. If that is the case, delete the key ‘TabbedBrowsing’. Then close the registry. After restarting, IE should work properly again.
Read More...

Wednesday, January 11, 2012

Using the Find and Replace function only for text contents(Excel XP, 2003, 2007)

By Wednesday, January 11, 2012 , No comments
          Just like Word, the table calculation off ers a function to Find and Replace terms. After you have changed a few words on a worksheet, the formulas compiled before with much eff ort cease to work and give wrong results.
           Perhaps you have not only changed the text contents, but also expressions in the formulas. To avoid this, before replacing, open ‘Edit | Go to’. Then click on ‘Special’ and select the option ‘Constants’. This selects all cells that do not contain any formulas. Now you can deactivate the individual check boxes under it – ‘Numbers’, ‘Text’, ‘Actual values’ or ‘Errors’, to further restrict the selection. Confirm with ‘OK’. Now you can execute the desired task.
BACKGROUND: The table calculation replaces key words in formulas with the ‘Find & Replace’-function without any warning. This, at best, causes error messages to appear, in worst case, unnoticed, wrong results. For example, if you wish to replace the term ‘Number’ with ‘Numbers’, this also replaces the function ‘NUMBER’, which you have possibly used in a formula. The situation gets more critical, if you wish to replace ‘and’ with ‘or’ in the text. This also changes the logical function ‘AND’ or ‘OR’ in formulas and give the wrong results, or perhaps no result at all – or only after its too late.
Read More...

Duplicating certain text parts of a document faster(Word XP, 2003, 2007)

By Wednesday, January 11, 2012 , No comments
             You want your documents to have the same contents, with slight changes in the details – for example signatures – to be able to send them to two diff erent recipients. The Mail Merge function would be too much for that.
            Using a link, you can make every text change get copied automatically in another area. First write the desired text on the first page and manually enter a page-break in the end with [Ctrl]+[Enter]. On the second page, enter the different text parts like headers and footers. Then on the fi rst page, select the text to be copied and copy it to the clipboard. On the second page, select the command ‘Edit | Paste’. In this field, select the type ‘Rich Text Format (RTF)’ and click on the ‘Paste link’ option next to it. After the confirmation with ‘OK’, Word creates a field, which reproduces the original content as it is and usually updates it automatically with a slight delay.
             In Word 2007, click on the menu ‘Start’ and then in the multi-function toolbar on the arrow under ‘Paste’, to execute the command ‘Paste’.
NOTE: For the next texts take care that changes to the source text are made within the source area of the link. Besides, you must not make any changes in the linked section, which can be identified with the grey of the border, since these are automatically overwritten. In the context menu of the linked area, you can manually ‘Update the links’ or make other settings through ‘Linked document object | Links’.
Read More...

Defining a preset size and color for notes(Outlook 2003, 2007)

By Wednesday, January 11, 2012 , No comments
             When creating a new note, the application opens a tiny window – too small to edit anything. So, an extra action is always required to increase its size with a mouse which can be very annoying.
             With a few actions, you can create a template, which can later be used instead of the standard note. For this, create an empty note through ‘File | New | Note’ and change its size to suit your requirement. You can also assign a new color, by clicking on the note symbol on the left in the title-bar and opening the system menu and selecting a ‘Color’. Alternatively, select ‘Tools | Options | Note Options’. Outlook now offers fi ve colors and three prescribed sizes as well as other fonts for the notes.
TIP: In Outlook 2007, you can only select the note color and through the ‘Categorization’ of notes.
             If the given options are not enough, open the system menu in a note, select ‘Save as’ and in the following dialog under ‘File type’ select the entry ‘Outlook-template (*.oft)’.
            Then assign another name and click on ‘Save’. To use your own template, open ‘File | New | Select form’. In the dialog of the same name, activate the entry ‘Templates in fi le system’ in ‘Search in’ and then double-click on the entry that you have created.
            You can considerably speed up the opening of the template, if you define a shortcut to it in the links area of Outlook. For that, you will require the path to the directory, in which the template is saved. You can find out the path as follows: in the combination fi eld ‘Search in’ of the dialog ‘Select Form’, select the entry ‘Templates in the fi le system’. Now you can read the path in the fi eld directly under the combination field.
             Start Windows Explorer with [Win]+[E] and navigate in the said directory. In the folder options under ‘View | Advanced Settings’ you might need to first activate the display of hidden files and directories with the help of the option ‘Show all fi les and folders’. Then click on the template you have saved, keep the left mouse key pressed and drag the entry in Outlook to the title ‘Links’ in the navigation area. As soon as a small plus-sign appears, let go of the mouse key. The new link has been created.
Read More...

Finding commands faster through usual classic menus(Office 2007)

By Wednesday, January 11, 2012 , No comments
           After the switch to Offi ce 2007, many users are irritated with the new operation of the multifunction toolbar. To avoid the tedious search for a command, you would like to use the usual old menus at least temporarily.
           Microsoft did not provide any option in the new Office to use the menus established over several generations of programs along with the new Ribbon-command toolbars. The freeware can be downloaded from ‘http://www.ubit.ch/software/ubitmenulanguages’ – giving you the option of additionally integrating the usual menu structure in new multi-function toolbar. This method is recommended, since you do not need to hide any menu points and at the same time, you can use the new operation method. If you do not find the command you are looking for, you can simply make way for the known menus.
          After the download, close all Office programs and install the program. The tool is an add-in, which is integrated as a general template. From the next program start, you will the additional Ribbon ‘Menu’ in all Office programs in the multi-function toolbar. With that you can access the usual structure of menus and toolbars. When you later no longer require the menu help, it can be easily removed from the Control Panel in Windows later.
Read More...

Checking results and formulas more easily(Excel XP, 2003, 2007)

By Wednesday, January 11, 2012 , No comments
            In a comprehensive calculation, you want it to be easier to identify as to which values are a result of formulas and which data has been entered. Besides, you want to quickly verify, how formatting the formulas aff ect the results.
             The editing toolbar shows the formula saved in the active cell. If you want excel to display all formulas of a worksheet at the same time, open ‘Tools | Formula Auditing | Formula Auditing Mode’. This mode can also be activated using the key combination [Ctrl]+[`], which can also help you switch back to the normal view.
              To be able to check all calculations effectively you will need to view the formulas and their results at the same time. For that, you use two windows one below the other with a view of the same calculation.
              Close all still open worksheets. Keep the cursor at the beginning of the current table and open ‘Window | New Window’. To arrange both views, select the ‘Window | Compare Side by Side with…’. In Excel 2007, switch to the Ribbon ‘View’ and click on ‘New Window’ and ‘Arrange all’. Select the option ‘Horizontal’ and confirm with ‘OK’. Then click on the button ‘Compare side by side with’. Then click in one of the two display windows and press the key combination [Ctrl]+[`], to display the formulas there. Every action in a Window is automatically visible in the adjacent window so that you can always compare the same section. To control the action, you can activate or deactivate the scrolling of the other table in the displayed toolbar ‘Compare side by side with’ using the button ‘Synchronous scrolling’. Editing of values or formulas is possible in both windows.
CAUTION: As far as possible, do not close the checking ‘Close side by side’. This changes the window arrangement, but leaves the second window open. It is better to close one of the two windows, so that the original worksheet is viewable in full size again. Then save the changed data, since you have only closed the viewing copy till now.
Read More...

Tuesday, January 10, 2012

Check installed programs for updates(All applications)

By Tuesday, January 10, 2012 , No comments
             Whereas Windows automatically takes care of important updates, you often do not know in case of the installed programs whether they are up-to-date or not.
             Many programs already have an integrated update function – but not all of them. In addition, it is not activated in most cases. However, missing updates put the system safety at risk. Hence, it is recommended that the status is checked with a freeware tool such as Secunia Personal Software Inspector, which can be downloaded from ‘http://secunia.com/vulnerability_scanning/personal’.
             For installation, open ‘PSISetup.exe’, select the language and start the wizard. Click ‘Private Use’ and then ‘Next’ in the user agreement. You can start the tool subsequently. After a few minutes, it displays the test result in the form of a list. It shows the list of programs for which updates are missing and gives a link for the respective downloads in the ‘Solution’ column at the same time. You must possibly conduct a check again after an update such that the relevant entry is removed from the list. The tool is integrated into the system and conducts new checks every week automatically.
               Even if the risks have been eliminated, you have still not gotten rid of all the danger sources. Right-click ‘Advanced’ above in the program window confirm the info dialog box with ‘OK’ for a detailed analysis with instructions for the programs, for which there are no simple solutions. Then check all the entries in the ‘Unsafe’ and ‘Outdated’ tabs. Click one single program entry to get detail information. Depending on the situation, the program shows which updates from the manufacturer are necessary. Take further steps for eliminating the respective risk using the elements in the ‘Toolbox’ that is displayed. You can request for the ‘Technical Details’ here, call up important websites of Secunia and the manufacturer via ‘Online references’ or ‘Open Directory’. You should ‘Ignore Program’ only if the doubtful fi le is present in the Backup folder for instance. You can ‘Download Solution’ here itself in many cases. You can get to the discussion space of the respective product on the Secunia website via the ‘Community Forum’ link. You can search for advanced help in English here. It is best if you uninstall outdated software if you do not need it anymore.
Read More...

Saturday, October 29, 2011

Increase the frequency of automatic retrieval in Outlook 2007, 2010

By Saturday, October 29, 2011 , No comments
             Outlook usually retrieves new messages automatically. But you have to wait for ages till the program in the background receives new messages.
             Outlook retrieves new messages every 30 minutes by default. But today’s fast computers and Internet connections makes shorter intervals also easily possible. The relevant options are unfortunately hidden away in the program. In Outlook 2007, open “Tools → Send/Receive → Send/Receive Settings → Define Send/Receive Groups.
             In Outlook 2010, select the “Send/Receive” tab in the menu bar, click “Send/Receive Groups” there and then “Defi ne Send/Receive Groups”. If you have not set up any specifi c groups, your list will only have the default group “All Accounts” and it is already selected. Else, select the relevant group in the list fi eld. Now ensure that the option “Schedule an automatic Send/ Receive every” is activated. Change the value in the input fi eld to “10” or “5” minutes, for instance. Repeat the setting for other groups id required. Confirm the change by clicking “Close”.
NOTE: Avoid an extremely short interval of one minute, since it can cause problems when large messages are being downloaded. This is because a new retrieval starts when the previous one is not yet complete. If you are waiting for an important message, you can request receipt of emails manually as well.
Read More...

End a hung tab or tools in Chrome 4, 5, 6, 7

By Saturday, October 29, 2011 , No comments
             Sometimes, individual scripts or websites are defective and hang or an extension in the browser causes problems. It is usually necessary to restart the browser which is very irritating.
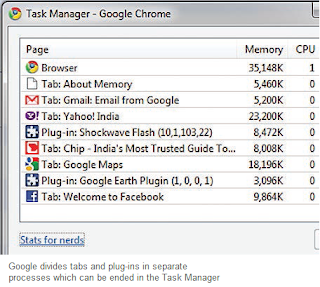
             Chrome was the fi rst browser to introduce a consistent separation of individual tabs at the process level. You can check this by starting the Task Manager when there are several tabs open in the browser. For this, press the key combination [Ctrl]+[Shift]+[Esc] and switch to the “Processes” tab. For example, in case of four open tabs, you see the process “chrome.exe” at least fi ve times, as a result of which it is not clear as to which process entry belongs to which tab.
              This information is provided by the internal task manager of Chrome. It can be called up from the Chrome program window by pressing the key combination [Shift]+[Esc]. You can also right click a free place above the address bar and select the contact command “Task Manager”. The following dialog box displays the tab or the plug-in with which a process correlates. Select the desired input and click “End process”.
              The link at the bottom of the task manager box “Stats for Nerds” can be used to call up more detailed information about memory use of individual processes and to identify which website is especially hungry for memory. Moreover, the overview also shows the memory requirement of all other currently opened browsers.
                You can thus end a hanging Flash Player or close a tab with a problematic website easily without affecting the remaining browser. The closed site displays a message in the tab and also makes it possible to reload the site.
Read More...

Increase the frequency of automatic retrieval in Outlook 2007, 2010

By Saturday, October 29, 2011 , No comments
             Outlook usually retrieves new messages automatically. But you have to wait for ages till the program in the background receives new messages.
             Outlook retrieves new messages every 30 minutes by default. But today’s fast computers and Internet connections makes shorter intervals also easily possible. The relevant options are unfortunately hidden away in the program. In Outlook 2007, open “Tools → Send/Receive → Send/Receive Settings → Define Send/Receive Groups.
             In Outlook 2010, select the “Send/Receive” tab in the menu bar, click “Send/Receive Groups” there and then “Defi ne Send/Receive Groups”. If you have not set up any specifi c groups, your list will only have the default group “All Accounts” and it is already selected. Else, select the relevant group in the list fi eld. Now ensure that the option “Schedule an automatic Send/ Receive every” is activated. Change the value in the input fi eld to “10” or “5” minutes, for instance. Repeat the setting for other groups id required. Confirm the change by clicking “Close”.
NOTE: Avoid an extremely short interval of one minute, since it can cause problems when large messages are being downloaded. This is because a new retrieval starts when the previous one is not yet complete. If you are waiting for an important message, you can request receipt of emails manually as well.
Read More...

THE WINDOWS TRICKS Headline Animator