Here are some interesting Operating system and softwares tips and tricks 4u.JUST CLICK ON THE PICTURE IN THE BLOG FOR ENALARGED VIEW.

sd
Showing posts with label Softwares. Show all posts

Thursday, March 8, 2012

Convert titles from the internal format to MP3(iTunes)

               You have purchased various songs in the iTunes store. As these are coded in Apple’s M4A or M4P format, the titles can normally be played only in iTunes or with an iPod.
               It’s possible to convert audio files in MP3 format directly from iTunes. For this, you only have to adjust the import settings. Open “Edit | Preferences” command and then select “General” category. Here, click the “Import settings” button. Now in the “Import using” combination field, change the setting to “MP3 encoder”. Confirm both open dialogs with “OK”. Open the media library or any playlist and select the desired title with the [Ctrl] key pressed. Then right click on it and select the context command “Create MP3 version”. For all newer files, this option should work, as Apple is doing away with the old and much criticized DRM protection of its files since some time. If some of the files cannot be converted, it probably concerns older DRM-protected M4P files. Collect these problematic cases in a separate playlist. Then right click to the left of this list and select the context command “Burn playlist on medium”. In the next dialog, make further settings for burning. As the format, select either “Audio CD” or “MP3 CD”.
                For the conversion process, you will however have to use the expensive disk. Or you can use softwares like NoteBurner or Virtual CD, to burn a virtual CD without a medium. After the procedure, you will either have an audio CD, a medium with MP3s or the images developed from virtual burning. Insert the disks or mount the images to copy down the music again, or to rip it.
Read More...

Tuesday, March 6, 2012

View hidden files in FTP client(FileZilla)

            An FTP client normally hides files whose names begin with a dot. You want to still access such files.
            If you use FileZilla as FTP client, open the “Server | Force showing hidden files” command. Confirm with “OK”. Some servers do not accept this option and show an incorrect file list or no file list at all. In such a case, deactivate the option.
Read More...

Set the time when the photograph was taken as the name of the photograph(Namexif 1.5)

             When you transfer photos from a camera to your PC, the files have cryptic names. You want to name the photos with the date and exact time.
              Download Namexif from digicamsoft.com and just save the installation file “Namexif.exe” in any of the folders or directly on desktop.
              Start the tool with a double click on the file entry in Windows Explorer. For newer versions of Windows, you will have to authorize these instructions by selecting a user account with administration rights and enter the related username. Finally click “Next” and confirm the license agreement. You will have to repeat this procedure each time you call up this application.
              Now you can add single photos with “Add files” or an entire folder with “Add Dir”. You can delete entries from the list with “Clear list”. However, keep in mind that you cannot remove individual entries. As a final step, click “Next”.
              Now specify the format you wish to rename the photos on the next page. Here, "YYYY" stands for year, “DD” for date and “HH” for hour. Furthermore, you can keep the date, time and the original name of the file or rename it. If you wish to retain the original name then select the option “Add original name at the end”. If you want to specify any other ending, then select “Add name (suffix)” and add the desired name in the following box. However, do not use both these functions together.
              With the “Shift time by” option you change the time zone by adding or subtracting time. This is especially handy when you have pictures that you clicked while on a trip abroad, but forgot to calibrate the camera time with the local time there.
Read More...

Speed up the program-start of music and video players(iTunes)

              iTunes-start is slow if you have a large media library. You would like to know about options for tuning and efficiency.
              The bigger the music data bank, the slower the iTunes. This becomes especially apparent on the older computers or with slow hard disks. Although a practical function, the intelligent playlists add to the delay, as iTunes updates all lists during every access. Therefore consider which of the lists are really useful and required.
               In case of other lists, you can right click the desired entries and delete them by means of the context command bar. If you wish to retain the list, it is logical to configure its settings. Use the context command bar “Edit Playlist” or simply right click on the Playlist. Here, deactivate the option “Update automatically”. If a list is constantly used, you can limit its size for improving performance during automatic update. For this, activate the option “maximum” and set the limit to say “25 objects” or “100 MB” next to it. Confirm your settings with “OK”.
Read More...

Saturday, February 25, 2012

Minimize programs in the taskbar or the info field(iTunes)

By Saturday, February 25, 2012 , , , , , No comments
             You play music on iTunes 24x7, but you don’t like the fact that the icon of iTunes occupies space in the taskbar even though you seldom access it.
              In the program options, you can configure a setting so that the icon is automatically minimized in the info field of the taskbar. You can also decide with the functionality of Windows whether the icon should be displayed or hidden. For this, select the command 'Edit | Settings' and click the Advanced icon in iTunes. Activate the 'Display iTunes icon in taskbar' option there. This is deceptive because the icon is still displayed but the option moves the display in the info field. Then activate the 'Minimize iTunes window in the taskbar' option.
             The next time the program window is minimized, it is visible only in the info field and disappears from there after some time. If you want to see the icon, click the small triangle there and then the “Adapt” link. Search for the “iTunes” entry in the list and change the setting to “Display icon and messages” in the relevant combination field to its right. The icon will be visible after you click “OK”.
Note: The mini mode of iTunes is a practical alternative. For this, minimize the program window and right click a free place in the taskbar. Then select the context command “Toolbar → iTunes”. Both these space saving variants are however mutually exclusive. You see a mini control bar that gives you direct access to the important playback and volume functions instead of the program icon only if iTunes is normally minimized.
Read More...

Set up quick and easy direct start for important tasks(Kaspersky Internet Security)

               In addition to the automatic protection from threats, you also want to conduct regular checks like system errors. For that, you will need to rummage through the entire menu.
               In Kaspersky Internet Security, you can create new links to directly start regularly used tasks. For this, right click the program icon in the info field of the taskbar and then select the context command “Settings”. Now click the “Scan” tab and then select “General Settings”. Here in the “Scan Tasks Quick Run” section you will find options to create shortcuts for specific tasks. You can use them to create a separate link for the “Full Scan”, the “Quick Scan” or “Vulnerability Scan”. After a click on it, you can change the target location “Desktop” to another one that is less visible and create the link by clicking “Save”. In the other available categories such as “Full Scan”, you also have the option of setting up an automatic, time-controlled execution of the relevant tasks, namely the “Start Mode” option.
Read More...

Thursday, February 23, 2012

Trace weak points in your system(Kaspersky Internet Security)

By Thursday, February 23, 2012 No comments
               Kaspersky Internet Security software not only provides automatic protection from viruses and hackers, but additionally also allows you to scan for vulnerabilities.
               Apart from inadequate virus protection and missing updates even unsuitable settings in the system can expose it to unnecessary risks to some extent. The tool, which is integrated in Kaspersky Internet Security, for Vulnerability Scan helps you to fi nd and search such harmful settings.
               To run the Vulnerability Scan open the main window of the Kaspersky software and go to ‘Tools’ tab. Here you will see the ‘Vulnerability Scan’ button, click start to begin. It will show results for ‘System Vulnerabilities’ as well as ‘Vulnerable Applications’. You can fi x the ‘System Vulnerabilities’ by clicking on the ‘Fix it’ button. While for the ‘Vulnerable Applications’ you can check the details and if the application is safe then you can create an exclusion rule by clicking ‘Add to Exclusions’.
Read More...

Wednesday, February 22, 2012

Play all video files without a problem(VLC media player)

By Wednesday, February 22, 2012 No comments
             When dealing with video fi les of diff erent formats, you often get annoyed with the fact that a Codec is often missing and needs to be installed. What you need is a quick playing program that also runs comfortably on somewhat older computers and notebooks.
             The current Windows Media Player or iTunes require a timeconsuming installation, a lot of memory space and enormous resources to play media fi les. The free VLC media player forms a great alternative. You will also find a portable version for mobile use, like on a USB stick. You can download the same from http://www.videolan.org/vlc/
             Start the installation and follow the wizard until the step “Select components”. Here, select the installation type “User-defined”. Decide whether you also want to install the browser plug-ins, and then scroll to the file type allocations. If you want to play individual fi le types in “Audio files” and “Video files” like “MP3” rather with another program, deactivate the control tick mark for this type. Leave all unknown types active so that they can be played by VLC media player if there is any confusion. Then click “Next” and “Install”.
            The program contains numerous Codecs and plays almost all common audio and video formats like AAC, AVI, FLV, MPG or OGG immediately. It also supports the streaming of MPEG and DivX videos. Moreover, the latest version now also uses separate graphic processors (GPU) as well as DSP for playing HD videos.
             A special advantage of the VLC media player is its capability to play even damaged or incomplete video fi les as well as fi lms opened from other programs. If, for instance, the Windows Media Player does not want to play a damaged file, open it in VLC media player. Even this will identify the defect but will try as against the Windows’s playing program to repair the fi le and at least play the part that does not have a defect. The original remains unchanged. Playing used videos is helpful is helpful when you have to convert a larger video fi le or if you want to quickly look into a download that has been started to see whether it is the video you wanted.
Read More...

Sunday, February 19, 2012

Tracking free podcasts and archiving them locally(iTunes)

By Sunday, February 19, 2012 , No comments
            Podcasts have established themselves as an information platform. A lot of this interesting content is available free of cost. But what is the best way to fi nd these podcasts? Can they be managed on an iPod?
            A good drop-in center for podcasts is the iTunes store and they come free. Open the iTunes store in iTunes and click ‘Podcasts’. A hit parade to the right shows the most popular elements. A click on a podcast delivers detailed information. You can select individual issues or ‘Subscribe for free’ with a mouse click. iTunes then sees to it that the new issues are automatically loaded in the future.
             Even the pan-program search is good for rummaging around. You can fi lter results found according to the medium type and click ‘Podcasts’. You will later find the downloaded fi les in the mediatheque.
            iTunes not only ensures that new podcasts are automatically fetched in the subscriptions, but also automatically deletes the older issues of a podcast after a certain time or after it has been played. This is useful to prevent the mediatheque from growing too big. However, if you want to preserve certain files for a longer time, adjust the relevant setting accordingly. For this, open the podcasts in the mediatheque and click ‘Settings’. In the ‘Settings for’ combination field, fi rst select ‘Podcasts (Standard)’ and determine the general behaviour. We recommend that you do not change the ‘Load latest’ setting. You will automatically get new parts now. The value in ‘Preserve issues’ is important. Decide if you want to preserve ‘All issues’ or only a specific number of last parts. Finally, you can also select a single podcast under ‘Settings for’, so that you can additionally assign deviating settings to it. Confirm with ‘OK’. Then check the delete permit in the context menu of the single podcast. If ‘Disallow automatic deletion’ is selected, the contents are preserved despite making changes in the settings. Select the ‘Allow automatic deletion’ context command so that these changed settings take effect.
Read More...

Saturday, February 11, 2012

Correctly setting the light and shadows in night shots(RAW Therapee 2.4)

By Saturday, February 11, 2012 No comments
             The second-hand SLR was inexpensive and can record RAW fi les, but there was no converter program in the package. You still want to use the advantages of the professional format for night shots.
             This is a clear case for the RAW Therapee converter (www.rawtherapee.com). The tool offers many controllers, especially when it comes to exposure, targeted adjustment of lights and shadows, and it can keep up with expensive commercial converters. You can also sharpen images, and remove image noise and lens errors. In version 2.4, RAW Therapee also supports managing of EXIF and IPTC Metadata. We explain the tool’s functioning with the help of a night shot.
ANALYZING THE IMAGE: After transferring to the PC, open the RAW photo by navigating to the specifi c folder. The image preview and the histogram show that dark areas are predominant. This is correct in case of a night shot. When you check the lights, you can see whether only the street lamps are actually cutting down the bright tonal values (‘clipping’).
SETTING WHITE BALANCE: Change to the ‘Color’. RAW Therapee shows a color temperature of 4,750 Kelvin for the sample image. Actually, the image seems to have a red tint. Set the value to 3,000 Kelvin. This makes the image look more natural. In order to correctly bring out the blue color of the dome, increase the blue proportion to ‘120’ in the channel mixer under ‘Blue’. Since the sum of the color controllers should be 100, so that the brightness remains constant, decrease the ‘Red’ and ‘Green’ proportions by ‘-10’.
ADJUSTING LIGHTS: Change to the ‘Exposure’ tab. Here, activate ‘Detail’ and set the magnifying glass to highlight. Move the ‘Exposure correction’ controller to the left and reduce the brightness such that the clipping warning disappears. Using ‘Restore lights’, try to bring out as many details as possible in the street lighting. READJUSTING EXPOSURE: Increase the exposure of the medium tonal values using the tonal value curve. With this, you can brighten up the building and the streets. Alternatively, you can also try the ‘Luminosity curve’, which aff ects the brightness channel of the LAB color space.
DENOISING AND SHARPENING: Like in many night shots, this one also has numerous disturbing pixels. For this, change to ‘Detail’ and activate the ‘Luminosity fi lter’ and the ‘Color noise fi lter’. Use the magnifying glass to search for a noisy section and set the controllers. The image uses sharpness due to fi ltering, and you can compensate this using the ‘Sharpness’ controller. Here, you need to be extremely careful, since sharpness and image noise have a negative eff ect on each other.
SAVING THE IMAGE: Click ‘Save as’ on the lower right side near ‘Save picture’ and specify name, format and target folder there. If ‘Save immediately’ is activated, the tool develops the image with the new settings on clicking ‘OK’ and fi nally saves the digital print in the target folder.
Read More...

Thursday, February 9, 2012

Eliminating color fringing at object edges(Adobe Lightroom)

By Thursday, February 09, 2012 No comments
         Color fringing occurs around objects in an image when the background lighting is very strong. Here’s how you fix it.
         Color fringing or chromatic aberration is usually in the form of red, green, blue or yellow glow around the edges of objects. They often occur in combination of colors. Adobe Lightroom comes in very handy here. Open the photo in Lightroom and set the zoom to 100 percent. Change over to the ‘Development’ module and go to the ‘Overlay’ section in the tools area to the right. The controls for chromatic aberration are present in the ‘Detail’ subsection. There are sliders for adjusting ‘Red / Cyan’ and ‘Blue / Yellow’. Depending on the color of the fringe slide the relevant slider until the color fringes disappear. You can remove the purple edges with the ‘Remove edge’ option. First test the setting ‘Highlight / Edges’. If the fringing is still visible, correct it with the option ‘All edges’.
Read More...

Tuesday, January 10, 2012

Enlarging picture details without any visible losses(Photoshop CS, CS2, CS3, CS4)

By Tuesday, January 10, 2012 , No comments
               Today, a 12 megapixel resolution is almost standard; in spite of that, it can still be less, basically when you want to enlarge a small detail in the picture. Conventional enlargement techniques hamper the eff ect of the photo, which leads to loss in details in the photo.
               At the latest when the resolution falls below 100 dpi (Dots per Inch, pixels per inch) because of upscaling the picture contents, it has a negative effect in print. It is not only the blur edges then, which spoil the joy of a large format print. You can get optimum quality even for bigger prints with a resolution of approximately 300 dpi. Detail enlargements are basically possible hundred times more. The achievable result naturally depends on the subject and its sharpness largely. The reason being that soft and unfocussed area look rather unpleasant in the enlargements.
ELIMINATING IMAGE NOISE: Scaling not only enlarges the desired image contents but also interfering artefacts. It is better if you try and eliminate them beforehand. First remove the image noise since the filter does no longer recognizes this as such later. For that, click ‘Filter | Noise Filter | Reduce noise’ (from CS3 onwards, ‘Noise | Reduce noise’ previously) and adjust the effect of the filter on your subject. However, proceed cautiously otherwise you will end up eliminating too many details. After this treatment, the photo looks a bit soft at first. Never mind, it can be sharpened later.
SPECIFYING THE DETAIL: Now specify the desired picture detail. Activate the ‘Crop’ tool for that; the fastest way to do it is by pressing the key [C] and drawing a frame. Adjust its size more accurately using the controls. Double-clicking the selection releases the area. If you want to set accurate dimensions, enter them in the field in the options bar. Important here: release the ‘Resolution’ field, otherwise Photoshop will integrate the missing pixels.
UPSCALING THE PICTURE: Now call up the ‘Image Size’ function with [Alt]+[Ctrl]+[I]. Activate ‘Re-apply image with’ and select ‘Bicubic smooth’. Enter the desired value in ‘Resolution’, e.g. ‘300 dpi’, and change the height and width if necessary. Clicking ‘OK’ executes the command.
RE-SHARPENING THE EDGES: The enlarged pictures looks relatively soft at first, basically at the contrast edges such as letterings. You must re-sharpen them at any cost and it is best if you do it with the ‘Unsharp Mask’ function, which is below the ‘Filter | Sharpen’ menu. In case of large format prints, you can easily sharpen more strongly. You can carry out a quick Before-After comparison by just clicking the preview picture once.
Read More...

Check installed programs for updates(All applications)

By Tuesday, January 10, 2012 , No comments
             Whereas Windows automatically takes care of important updates, you often do not know in case of the installed programs whether they are up-to-date or not.
             Many programs already have an integrated update function – but not all of them. In addition, it is not activated in most cases. However, missing updates put the system safety at risk. Hence, it is recommended that the status is checked with a freeware tool such as Secunia Personal Software Inspector, which can be downloaded from ‘http://secunia.com/vulnerability_scanning/personal’.
             For installation, open ‘PSISetup.exe’, select the language and start the wizard. Click ‘Private Use’ and then ‘Next’ in the user agreement. You can start the tool subsequently. After a few minutes, it displays the test result in the form of a list. It shows the list of programs for which updates are missing and gives a link for the respective downloads in the ‘Solution’ column at the same time. You must possibly conduct a check again after an update such that the relevant entry is removed from the list. The tool is integrated into the system and conducts new checks every week automatically.
               Even if the risks have been eliminated, you have still not gotten rid of all the danger sources. Right-click ‘Advanced’ above in the program window confirm the info dialog box with ‘OK’ for a detailed analysis with instructions for the programs, for which there are no simple solutions. Then check all the entries in the ‘Unsafe’ and ‘Outdated’ tabs. Click one single program entry to get detail information. Depending on the situation, the program shows which updates from the manufacturer are necessary. Take further steps for eliminating the respective risk using the elements in the ‘Toolbox’ that is displayed. You can request for the ‘Technical Details’ here, call up important websites of Secunia and the manufacturer via ‘Online references’ or ‘Open Directory’. You should ‘Ignore Program’ only if the doubtful fi le is present in the Backup folder for instance. You can ‘Download Solution’ here itself in many cases. You can get to the discussion space of the respective product on the Secunia website via the ‘Community Forum’ link. You can search for advanced help in English here. It is best if you uninstall outdated software if you do not need it anymore.
Read More...

Monday, September 19, 2011

Back up data using an affordable cloud service( Amazon S3)

By Monday, September 19, 2011 , No comments
               The online storage service is not just for developers. You can use it as a cheap online backup location for all your important files.
               If you are looking for a simple, inexpensive online Web storage service, opt for Amazon S3. Contrary to the popular belief, this service from Amazon is not just for developers. It is equally useful  for  home  users.  It  can  be  used  to store your data like music fi les, videos, pictures etc or you can use it to back up your local hard drive. Instead of folders, there are buckets in which you can store your fi les. You have to select a region where you wish to store the bucket. Amazon  S3  is  available  in  US  Standard, EU (Ireland), US West (Northern California), Asia Pacific (Singapore), and Asia Pacific (Tokyo) regions. Select the region  closest  to  you  so  that  you  can save time and minimize cost. You can retrieve the fi les saved in the bucket via a unique developer assigned key. Amazon S3  is  also  very  cost  effective, as it functions on the policy that you pay only for what you consume.
Read More...

The Office Menu 2010 offers many features, but often not where you want it. However, you can customize the menu to your style of working.( Office 2010)

By Monday, September 19, 2011 , No comments
                   The Office Menu 2010 offers many features, but often not where you want it. However, you can customize the menu  to  your  style  of  working.
                From  version  2010  onwards, you can set up the menu in all Office applications individually. To do so, open ‘File | Options’ and click on ‘Customize Ribbon’ from the options displayed on the left.
                You can even customize the standard commands to a certain extent. To do so, select  ‘All  Tabs’  in  both  the  combo-box sets. The section ‘Main Tab’ defines the available tabs. Individual commands are organized into groups and to display them, click on the plus sign in front of  the relevant tabs. You can then move the selected group by a simple drag-and drop action. But before that, you will have to create a new group, as you cannot add a command to the existing groups. Creating a new group is fairly simple; all you  have  to  do  is  right-click  at  the  desired place and then click on ‘New Group’. You can even rename the group that you have  created.  For  example,  in  Excel,  the group ‘Macros’ is in the tab ‘View’. For immediate access, you can move this to the ‘Start’ tab.

Read More...

Define specific cells as per the maximum value( Microsoft Excel)

By Monday, September 19, 2011 , No comments
                 You want to display the content of one result  cell  in  another  which  is  to  the left of the relevant maximum value of a specific data fi eld in the table sheet.
                 This task can be carried out using a combination of three simple functions.The functions are used in one single formula. Just imagine: The fields “B1” to “B4”  contain  four  numbers.  If  the  largest number  is  in  “B3”,  the  result  cell  should return the value from “A3”. For this, enter the formula given here:
=INDEX(A1:A4,
MATCH(MAX(B1:B4),B1:B4,0),1)
“MAX(B1:B4) first identifies the largest value from the data set. This value serves as a search criterion for the comparison that is extended to the search matrix “B1:B4”. With the comparison type “0”, the function identifies the position of the first value from the search matrix that is identical to the search criteria.
                The matrix variant of the “INDEX” function then uses the searched value from the value matrix “A1:A4” that is located in the fi rst column of the row defined by the comparison.
Read More...

Saturday, August 7, 2010

Emulating the Tilt-Shift effect in Photoshop(Tip for Adobe Photoshop)

By Saturday, August 07, 2010 , No comments
          What some vacation pictures actually show is insignificant cant, but they still bring back memories. Therefore, some photos are meant to be kept even though they might not be amongst the best ones you’ve shot. Here’s a way to enhance them using Photoshop.
          Photograph differently: While there are several ways to breathe life into ordinary photos, one of them is the tilt shift effect. This effect can be obtained using specific lenses with cameras, but they are rather expensive. The effect essentially focuses on a specific area in the frame, hence sharpening it, and blurs the rest of the frame while increasing the depth of field. Apart from using expensive tilt-shift lenses, the effect can be obtained using a reasonably priced Lens baby lens too. The best option to capture such scenes is to shoot them from a height.
          Optimizing on a PC: The tilt-shift effect can be emulated in Photoshop by using the Gaussian Blur filter. Open the shot image in Photoshop, choose the Gaussian Blur filter from the menu and set the brush radius to ten pixels. Now use the selection tool and select an area (perhaps the center) that you think
should appear to be sharp. Rectangles or ellipses are suitable shapes to make a selection. From the options bar, click ‘Correct Edges’ and create a ‘Feather’ with 60-70 pixels. Now create a ‘Level’ adjustment layer and drag this under the ‘Unsharp Layer’. Increase the ‘Hue/ Saturation’ and Brightness/Contrast’ for the Unsharp layer to an extent such that the picture appears deliberately artificial. Now let’s add another vignette,
so go to Image | Canvas size and set the Height and Weight to 110 percent. Now let’s add an oval selection on a new layer, so select ‘Feather’ while having a 90 pixel brush. Here, clicking ‘Inverse’ will select the corners of the image. Fill these corners with black and reduce the opacity of the layer. Finally reduce the canvas size to 90 percent.
source: chip plus
Read More...

Friday, August 6, 2010

Simplifying a task (to-do) list(Word XP,2003)

By Friday, August 06, 2010 , No comments
          Let’s say you have a lengthy to-do list where some tasks are complete and some pending. Now, you might not want to see the tasks that have been completed, but you don’t want to delete them either. Here’s how you can hide and unhide them easily.

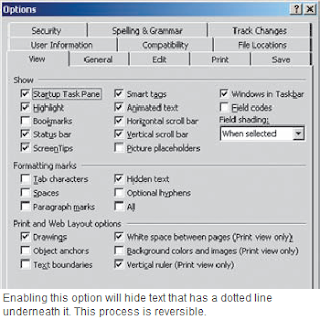
         To hide some text select the completed tasks from the list, and from the menu select Format | Font. Here, check the option ‘Hidden’ under the ‘Effects’ tab. Now the text you selected is marked hidden. 
         The toggle switch: From the main menu select Tools | Options, In the ‘View’ tab, check the option ‘Hidden Text’ under ‘Formatting marks’. Now you do this to hide and unhide the hidden text. When the marked ‘hidden’ text is unhidden, it shows a dotted line underneath it. Print the completed tasks: When hidden the text does not get printed, so you can take a print out when the completed tasks are in the hiding. Then for a complete list, simply unhide them by toggling the view, Tools | Options | View | Hidden Text. (Shortcut: Alt+T | O | I| Enter).
source: chip plus
Read More...

THE WINDOWS TRICKS Headline Animator