The User Account Control (UAC) is a matter of dispute. In Vista, a user has the option of disabling it entirely. You wonder how it works in Windows 7.
In Windows 7, you can select from four different User Account Control levels.For this, open ‘Start | Control Panel’ and then click ‘System and Security’ and ‘Security Center’. In the classic view of the control panel, you can go to this window directly via the ‘Security Center’ icon. Then click the ‘Change Settings of User Account Control’ link in the left side of the window. This must be confirmed via the User Account Control and must be authorized by selecting an account with administrator rights and
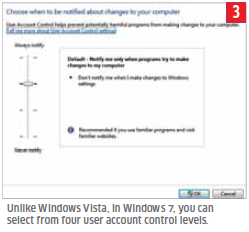 entering the password. You can now select from four security levels of the User Account Control in the next dialog box. For this, move the scroller to the desired setting using the mouse and confirm with ‘OK’. This must also be confirmed by means of an authentication via an administrator account.
The securest setting informs you about all changes made to the system settings that require administrator rights. For this, Windows dims the desktop out and you cannot access other applications till you decided about the changes to be made to the system settings. Microsoft calls this status ‘Safe Desktop Mode’.
The next level only provides information about attempts to make changes using external programs. As against that, if you make changes manually, they are ignored by this new User Account Control level. The third level functions exactly like the second but does not involve the dimming out of the desktop.
The fourth level provides no more information and is completely automatic in it functioning: If you are logged on as the administrator, hackers or viruses can make easily system changes without any kind of control. If you are using a user account without administrator rights, Windows rejects all system changes
without any queries.
In Windows 7, you can select from four different User Account Control levels.For this, open ‘Start | Control Panel’ and then click ‘System and Security’ and ‘Security Center’. In the classic view of the control panel, you can go to this window directly via the ‘Security Center’ icon. Then click the ‘Change Settings of User Account Control’ link in the left side of the window. This must be confirmed via the User Account Control and must be authorized by selecting an account with administrator rights and
entering the password. You can now select from four security levels of the User Account Control in the next dialog box. For this, move the scroller to the desired setting using the mouse and confirm with ‘OK’. This must also be confirmed by means of an authentication via an administrator account.The securest setting informs you about all changes made to the system settings that require administrator rights. For this, Windows dims the desktop out and you cannot access other applications till you decided about the changes to be made to the system settings. Microsoft calls this status ‘Safe Desktop Mode’.
The next level only provides information about attempts to make changes using external programs. As against that, if you make changes manually, they are ignored by this new User Account Control level. The third level functions exactly like the second but does not involve the dimming out of the desktop.
The fourth level provides no more information and is completely automatic in it functioning: If you are logged on as the administrator, hackers or viruses can make easily system changes without any kind of control. If you are using a user account without administrator rights, Windows rejects all system changes
without any queries.