Here are some interesting Operating system and softwares tips and tricks 4u.JUST CLICK ON THE PICTURE IN THE BLOG FOR ENALARGED VIEW.

sd

Thursday, August 19, 2010

Timely detection of dangerous websites(Internet tips)

By Thursday, August 19, 2010 No comments
          Although firewalls and anti-virus programs protect our computers from being infected, there’s always a risk of coming across dangerous websites that you want to keep a distance from.
          A link scanner can be quite helpful in such cases.It is a tool that notifies users about potential dangers even before you visit a website.The online community called WOT (Web Of Trust) can be used.Based on the classifications of participating users, it classifies and rates websites as safe or unsafe to visit.This help is available as add-ons for Internet Explorer and for Firefox.To download the add-ons, you can visit http://www.mywot.com, and go to the‘Download’ section.
          Installation: When using Internet Explorer, start the MSI file.If you’re using Firefox, uncompress the ZIP archive to extract the XPI file from within. Open the file in Firefox using the File | Open command, click ‘Install’ and restart the browser.On the startup page where you see the basic settings and introduction, select the setting ‘Simple’ and click ‘Next’ to proceed.
          Application: This tool adds a new icon to the navigation bar and its color represents the assessed result of the currently opened web page. Green signifies trustworthiness and red means danger, and hence the website should be exited from. If you’ve noticed in your Google search results, there are WOT classifications next to the hits, and this is even before you click on a page to open it.On ignoring this indication, a user is presented with a full page warning, which asks for a confirmation of approval from the visitor before opening the page.
source: chip plus
Read More...

Modifying, configuring and re-designing menu bars(tip for Opara 10)

By Thursday, August 19, 2010 No comments
            A browser offers options to modify menu bars and symbol bars as per the users’ requirements so that the on-screen space is utilized efficiently.While making modifications, you might accidentally hide the menu bar, due to which the settings become inaccessible.

          As long as the tab bar is visible,the menu bar can be reactivated quickly.If the tab bar is gone, you need to bring that back first. Right-click on the status bar and select ‘Modify bars | Appearance’ from the context menu. In the following box, activate the ‘Tab bar’ and confirm by clicking ‘OK’. You can then retrieve other menus from the list.
If can become difficult if you have removed relevant symbol bars such as the status bar. In this case, you need to access the configuration file called ‘opera-prefs.ini’. First, close the browser. Open Windows Explorer and type ‘%AppData%’ in the address bar and push ‘Enter’. Look for the Opera/opera sub-folder. Now, open the file ‘operaprefs.ini’ using notepad. Search for the string ‘Show Me-nu=’, change its value to ‘1’ and save the file. Now, when you start Opera, the menu bar will be available,hence making other settings accessible.
source: chip plus
Read More...

Tuesday, August 17, 2010

Viewing the content of cookies and altering them if required(tip for Firefox)

By Tuesday, August 17, 2010 No comments
          On one hand, cookies enable useful features on websites, and on the other, they can pose threat to security. It is difficult to turn cookies off because some sites do not work properly if you disallow cookies.
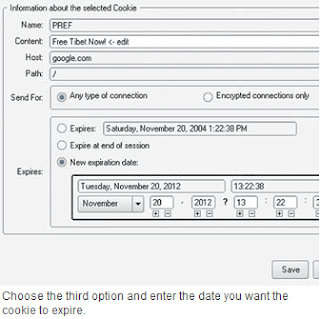
          With the add-on called Add N Edit cookies, you can find out and edit information which is saved inside cookies. While the official version of the add-on seems incompatible with Firefox 3.5, a slightly modified version you can use as an experiment is available at https://addons.mozilla.org/en-US/firefox/addon/13793.The installation procedure is same as installing any other add-on. Start the tool with the command Tools | Cookie |Editor. Here, when you select a cookie from the list, the tool displays its content and its properties.After you click on ‘Edit’, all values of the cookie can be modified in the following dialog box. This tool is useful when you want to extend the duration of a useful cookie, and, you can also determine the period up to which an automatic registration on a website like box.net is valid. The option of specifying the period depends on the configuration of Firefox you are using. Go to Tools | Options,and in the ‘Privacy’ tab activate ‘Accept third-party cookies’. Also, set the option ‘Keep until’, as ‘they expire’. As long as ‘Firefox will create a chronicle’ is visible,this setting will be valid.
source: chip plus
Read More...

Saturday, August 14, 2010

Adding the Lightning calendar to Thunderbird(tip for Thunderbird 3 browser)

By Saturday, August 14, 2010 No comments
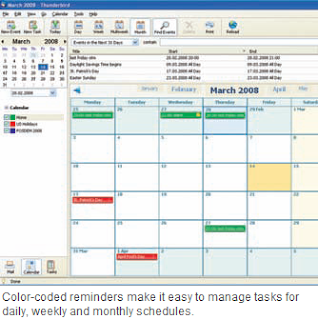
          Finally, Thunderbird 3 is available and it supports tabs. However, it doesn’t have the Lightning calendar integrated in it.Nonetheless, the option is available as an add-on for the client. It’s a ‘Nightly Build’ version available for development and testing purposes.
          Installation: Download the test version of the add-on from http://www. mozilla.org/projects/calendar/lightning/ download.html. Save the XPI file on your hard drive. In Thunderbird, go to Tools | Add-ons, and under the ‘Extensions’
tab, click ‘Install’. Navigate to where you had saved the add-on and select install.Restart Thunderbird to activate the add-on.
          Using Lightning: Click the tab bar at the right-hand side of the calendar icon.The program will start in a separate tab.The default calendar named ‘Private’, can be renamed from ‘Properties’, right-lick to access the context menu and make your selection. Use the arrow buttons and navigate through the daily, weekly and monthly views.
          Synchronize with Google Calendar: If you manage your appointments using the online Google Calendar, you can synchronize and display them here in Lightning. Download the latest version of the GData Provider program and its integration with Thunderbird is like installing another add-on. After installation, restart Thunderbird, open the calendar view, right-click on the empty space below it and select ‘New Calendar’. When prompted, select the options My Network | Google Calendar.When shot from an elevation, subjects in such pictures resemble toys or miniatures.
Now let’s access your Google Calendar from the browser. Once you have Google Calendar on your browser, go to Settings and right-click on the calendar that you want to import to Thunderbird. Next, go to ‘Calendar addresses’, click ‘XML’ and copy the web address shown in the superimposed dialog box. Switch back to the Thunderbird dialog box, and add this address into the ‘address’ field.Click ‘Next’ and enter the user name and password of Google Calendar. Now, you can name your new calendar and click ‘Finish’. Lightning is now synchronized with Google Calendar. If you enter your appointment details in one place, the other will get automatically updated.
source: chip plus
Read More...

Wednesday, August 11, 2010

Excluding specific addresses from a list of recipients(tip for MS Outlook 2007)

By Wednesday, August 11, 2010 No comments
          A recipients list is useful when sending out emails to a specifi c group of people, but there might be times when you want to exclude someone who need not see that email.
          Here’s how to exclude someone from an emailing list. Enter the name of a recipient in the address bar of the message, and look for ‘Check names’ on the multi-function bar, then click ‘Message’. Alternatively, add recipients with the help of the ‘To’ and ‘Select name: Contacts’ dialogue box. Outlook will then format the names of the recipients in bold. Now, you’ll see a plus sign in front of the name.
          On clicking this plus sign, you’ll be prompted to expand the recipients list.Confirm by clicking ‘OK’. Now, Outlook will replace the recipients with their individual names and email address.You can now add and remove individual contacts from the list.
Read More...

Monday, August 9, 2010

Display messages in a text format by default(Tip for MS Outlook 2007)

By Monday, August 09, 2010 No comments
          Emails land up in the Inbox in two formats, HTML and text; the former being potentially harmful. So is there a way to receive emails in the safer format by default?
          Here’s how to get Outlook HTML files converted to only-text messages automatically. Go to Tools | Trust Center, you’ll see a window which has settings for security and data protection. On the left-hand side pane, click ‘Email security’. Here, under the ‘Read as text-only’ field, check the option that says ‘Read standard messages in text-only format’. If you wish to apply this rule to digitally signed messages, then also enable ‘Read digitally signed messages in text-only format’.
Read More...

Saturday, August 7, 2010

Emulating the Tilt-Shift effect in Photoshop(Tip for Adobe Photoshop)

By Saturday, August 07, 2010 , No comments
          What some vacation pictures actually show is insignificant cant, but they still bring back memories. Therefore, some photos are meant to be kept even though they might not be amongst the best ones you’ve shot. Here’s a way to enhance them using Photoshop.
          Photograph differently: While there are several ways to breathe life into ordinary photos, one of them is the tilt shift effect. This effect can be obtained using specific lenses with cameras, but they are rather expensive. The effect essentially focuses on a specific area in the frame, hence sharpening it, and blurs the rest of the frame while increasing the depth of field. Apart from using expensive tilt-shift lenses, the effect can be obtained using a reasonably priced Lens baby lens too. The best option to capture such scenes is to shoot them from a height.
          Optimizing on a PC: The tilt-shift effect can be emulated in Photoshop by using the Gaussian Blur filter. Open the shot image in Photoshop, choose the Gaussian Blur filter from the menu and set the brush radius to ten pixels. Now use the selection tool and select an area (perhaps the center) that you think
should appear to be sharp. Rectangles or ellipses are suitable shapes to make a selection. From the options bar, click ‘Correct Edges’ and create a ‘Feather’ with 60-70 pixels. Now create a ‘Level’ adjustment layer and drag this under the ‘Unsharp Layer’. Increase the ‘Hue/ Saturation’ and Brightness/Contrast’ for the Unsharp layer to an extent such that the picture appears deliberately artificial. Now let’s add another vignette,
so go to Image | Canvas size and set the Height and Weight to 110 percent. Now let’s add an oval selection on a new layer, so select ‘Feather’ while having a 90 pixel brush. Here, clicking ‘Inverse’ will select the corners of the image. Fill these corners with black and reduce the opacity of the layer. Finally reduce the canvas size to 90 percent.
source: chip plus
Read More...

Friday, August 6, 2010

Simplifying a task (to-do) list(Word XP,2003)

By Friday, August 06, 2010 , No comments
          Let’s say you have a lengthy to-do list where some tasks are complete and some pending. Now, you might not want to see the tasks that have been completed, but you don’t want to delete them either. Here’s how you can hide and unhide them easily.

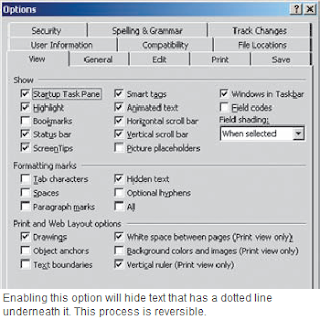
         To hide some text select the completed tasks from the list, and from the menu select Format | Font. Here, check the option ‘Hidden’ under the ‘Effects’ tab. Now the text you selected is marked hidden. 
         The toggle switch: From the main menu select Tools | Options, In the ‘View’ tab, check the option ‘Hidden Text’ under ‘Formatting marks’. Now you do this to hide and unhide the hidden text. When the marked ‘hidden’ text is unhidden, it shows a dotted line underneath it. Print the completed tasks: When hidden the text does not get printed, so you can take a print out when the completed tasks are in the hiding. Then for a complete list, simply unhide them by toggling the view, Tools | Options | View | Hidden Text. (Shortcut: Alt+T | O | I| Enter).
source: chip plus
Read More...

Tuesday, August 3, 2010

Deleting the sequence from the context menu option of the minimized programs(for Windows 7)

By Tuesday, August 03, 2010 No comments
          The new taskbar offers several functions of elements over the context menu. Under this you will also find recently opened applications linked the files that have been accessed. However you wouldn’t want this to happen. For instance, in case of Internet Explorer you should preferably not display websites that were visited for safety reasons.


          Hide the sequence. For that, right-click on the unoccupied space of the task bar and select ‘Properties’. Uncheck ‘Store and display the recently opened documents in the start menu and in the task bar’ option in the ‘Start menu’ tab. The remaining sequence is thus preserved. In order to disable this uncheck the second option ‘Store and view the recently viewed programs in the start menu’. Confirm with ‘OK’.
source: chip plus
Read More...

Sunday, August 1, 2010

Increase the snapshot delay while restoring the system(for Windows XP)

By Sunday, August 01, 2010 No comments
          After boot up Windows generates restore points at regular intervals, the so-called snapshots. This slows down
the system for a longer period.
          There is a setting in the registry with which you can defi ne the idle time of the system up to the starting of the
snapshot job. For this, select ‘Run’ in the start menu. Then, open the Registry editor by calling ‘regedit’, followed by clicking ‘OK’ and thereafter the ‘HKEY_LOCAL_MACHINE\SOFTWARE\ Microsoft\Windows NT\CurrentVersion\SystemRestore’ key. Subsequently, create the ‘ThawInterval’ entry by
following the ‘Edit | New | DWORD value’ path; double click and enter the waiting time in seconds for the ‘Value’. However, the default value is ‘900’, i.e. 15 minutes. Set the value, for instance, to ‘1800’ for double the time, i.e. 30 minutes.
         You do not need the protection function, deactivate the system recovery option. For this, open ‘Program            | Accessories | System tools | System restore’ in the start menu, then left click on ‘System restore settings’ and put a check mark in front of the ‘Turn off System Restore on all drives’ option in the dialogue box.
source: chip plus
Read More...

Tuesday, July 27, 2010

Selectively display the icons in the system tray(for Windows 7)

By Tuesday, July 27, 2010 No comments
          Windows 7 hides many of the system tray icons in its standard settings and only displays entries of the default programs. A longer display time would be desirable for specific actions.
          You can modulate the specifications of your requirements accordingly and that too separately for each program. For that, right-click on the task bar and select ‘Properties’. Click ‘Customize’ under ‘Notification area’ in the ‘Task bar’ tab. Search for the desired program in the list. Select the ‘Show icon and notifications’ setting from the drop down menu. Do this for all programs whose symbol should be displayed in case of Windows when in use. You must repeat this procedure once again for the newly added programs. The ‘Hide icon and notifications’ setting is not recommended as many of the important notifications go unnoticed. After clicking on ‘OK’, they are configured on their own. Furthermore, hidden symbols can be seen as before with a click on the arrow which is located to the left of the system tray.
Note: If the need arises, you can quickly delete all the individual settings in this dialogue box using the ‘Restore the default setting for icons’ link. You can even display all the icons by selecting the ‘Always display all the icons and notifications on the task bar’ option. However, in this case the system tray takes up a lot of space. Thus, this setting is useful only in case of very big monitors which work with high resolutions.
source: chip plus
Read More...

Monday, July 26, 2010

Check for hardware compatibility before installing(for Windows 7)

By Monday, July 26, 2010 No comments
          You should know before shifting to Windows 7 whether or not your peripherals like printers and scanners, which you have been using till now, are fully compatible with the new operating system.
          Visit ‘www.microsoft.com’. Navigate to ‘Windows’ and select ‘Windows Compatibility Center’. Select the option ‘Hardware’ which is given on the left side and enter the name of your device in the search field, for example ‘Epson Perfection’ for your scanner. Then, click ‘Search’. Your printer should work fi ne if you are able to view the ‘Compatible – Windows 7 Logo’. Now it can be said that the model has passed the Microsoft tests. The entry ‘Compatible’ means that the manufacturer has checked the function. In case it displays ‘Not compatible’ message it is recommended that you stop the upgrading to Windows 7 if possible or purchase a new hardware
Note: The list is too long but still incomplete. The new Windows is compatible even for the devices which are not mentioned in the list.
source: chip plus
Read More...

Sunday, July 25, 2010

Display the context option for the prompt immediately(For windows Vista,7)

By Sunday, July 25, 2010 , No comments
            The ‘Open the prompt here’ context command is available in Windows Explorer only if you press [Shift] while right clicking on an icon. Among other devices it is said to be complicated in case of Notebooks as both the hands are required in this process.
           Relocate the context menu in a standard manner in the menu selection bar by entering the Registry. For this, type ‘regedit’ in the search fi eld of the start menu and press the [Enter] key. If necessary, confirm the user account control question with ‘Yes’ and/or ‘Continue’. Navigate your way to the ‘HKEY_CLASSES_ROOT\Directory\ shell\cmd’ key in the Editor. Click on the ‘Extended’ string which is placed on the right side of the window and delete it. Then navigate your way to the ‘HKEY_ CLASSES_ROOT\Drive\shell\cmd’ key.
         Delete the ‘Extended’ string here. This ensures that the context menu is made available immediately even for drives. The function can be used after you close the registry.
Note: To cancel the changes, fi ll in the ‘Extended’ entry again in each of the Registry keys with the ‘Edit | New | String’ command without defining a specifi c value.
source: chip plus


Read More...

Friday, July 23, 2010

Display system folders such as the Recycle Bin in Windows Explorer(for Windows 7)

By Friday, July 23, 2010 No comments
          The new Windows Explorer no longer displays system elements like ‘Recycle bin’ and ‘Control panel’ on the left side of the window. Accessing them was extremely easy that way. 
         System objects can be integrated even in the current Windows version. For that, you just need to change the basic Windows Explorer settings. Open the settings and click on ‘Organize’. Select the ‘Folder and Search Options’ command in the following menu. After this, activate the option ‘Show all folders’ in the ‘Navigation pane’ under the ‘General’ tab. Confirm your changes with ‘OK’.
source: chip plus
Read More...

Thursday, July 22, 2010

Reactivate the inoperative help and support center(for Windows XP)

By Thursday, July 22, 2010 No comments
            The help and support center which could be called up via the ‘Help and support’ option in the Start menu had always proved to be very convenient. And then it suddenly stopped functioning without any apparent reason.
             The function can mostly be resurrected via the command line. Start it with ‘Start | Run’, and followed by the ‘cmd’ call. Type the following command and confirm it with [Enter].
net stop helpsvc
cd /d %windir%\pchealth\helpctr
rd packagestore /s /q
cd binaries
start /w helpsvc /svchost
netsvcs /regserver /install
Open the ‘Task manager’ with the [Ctrl]+[Alt]+[Del] key combination and then select the ‘Processes’ tab, then
right click on each of the following entries and click on the ‘End process’
key:
helpsvc.exe
helphost.exe
helpctr.exe
Then switch to prompt again and enter Net start helpsvc and press [Enter]. This should make the help and the support center function.
source: chip plus
Read More...

Friday, July 16, 2010

Recreate a classic start menu and also use it(Tips for Windows 7 )

By Friday, July 16, 2010 No comments
          While the classic start menu is optionally available in Vista, Windows 7 does not have this option at all. It is thus confusing for beginners who have only used XP so far. 

    You can convert a different start menu element to a classic start menu with a trick. Right click on the task bar and select ‘Properties’. Then switch over to the ‘Start menu’ tab and click on ‘Customize’. Now search for the ‘TV recordings’ element under the selection list; it is quite likely that you have not used it till now. 
          Enable the ‘Display as menu’ option in this tab and then close this dialogue box with ‘OK’. Confirm the configuration by clicking on ‘Apply’ and then ‘OK’. 
          In order to carry out the further steps, ensure that hidden folders are accessible. First open Windows Explorer and then go to ‘Organize | Folder and Search Options’. Search for the ‘Hidden fi les and folders’ option under ‘Advanced settings’ in the ‘View’ tab. Enable the ‘Show hidden fi les, folders and drives’ option. Confirm the change by clicking on ‘Apply’ and then ‘OK’.
          Now open the Start menu and right click on the new ‘TV recordings’ option. Select the context command ‘Properties’. Select the ‘Public TV recordings’ in the ‘Library’ tab and then select ‘Delete’. Now click ‘Add folder’. In the newly opened window, navigate to ‘Program Data\Microsoft\Windows\Start menu\Programs’ folder under ‘Computer’. Here, do not confuse ‘Program Data’ with the ‘Program files’ folder. Then click ‘Include folder’. In the ‘Optimize this library for’ field, change the setting to ‘General items’. Confirm this setting with ‘Apply’ and then ‘OK’. 
          Now open the start menu again and right click on the ‘TV recordings’ option. Select the ‘Rename’ context command, change the name to ‘Programs’ and press Enter. From now on, you will see the classic view via ‘Programs’ in the start menu. The only difference being: You have to navigate twice through the ‘Programs’ level. This small bother ensures that future changes are automatically incorporated into the new Start menu. Along with the normal old menu, you can also use the new Start Center offered by Windows 7 without any restrictions.
 please write your comment below

Read More...

Thursday, July 15, 2010

Close a group of Explorer windows simultaneously(Tips for Windows XP, Vista, 7 )

               When you open a folder from ‘My Computer’ and then navigate further into the directory structure, Windows opens several windows. It later becomes quite tedious to close every window individually.
                 Deeply nested directories that are open in several windows can be quickly closed with a trick  

    Activate the Explorer window for the last opened folder in the directory structure. Then, keep the [Shift] key pressed and click the icon with a cross in the title bar of this window. Windows then closes all the windows of the higher-level folders simultaneously.
    Note: If you always wish to open a folder in an existing window and not in a new one  select ‘Tools | Folder Options’ in Windows and ‘Organize | Folder and Search Options’ in case of new Windows versions. Enable the option ‘Open each folder in the same window’ in the ‘General’ tab.
    Please write your commend.
    source: chip plus
    Read More...

    THE WINDOWS TRICKS Headline Animator